Here's another simple Gnome CD/DVD burning application.
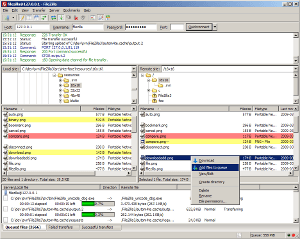
Brasero CD/DVD Burning Linux Software
Brasero, simple and easy to use yet another GNOME CD/DVD burning application for the Gnome desktop.
Features
* Supports multiple backends: cdrtools, growisofs and libburn(optional).
Note: compiling against libburn is _not_enough. You need to activate the backend through GConf editor at "/apps/brasero/config/libburn_burn and /apps/brasero/config/libburn_iso"
* Data CD/DVD: supports edition of discs contents (remove/move/rename files inside directories)
* can burn data CD/DVD on the fly
* automatic filtering for unwanted files (hidden files, broken/recursive symlinks, files not conforming to joliet standard, ...)
* supports multisession
* supports joliet extension
* can write the image to the hard drive
* can check disc file integrity
* Audio CD: write CD-TEXT information (automatically found thanks to gstreamer)
* supports the edition of CD-TEXT information
* can burn audio CD on the fly
* can use all audio files handled by Gstreamer local installation (ogg, flac, mp3, ...)
* can search for audio files inside dropped folders
* full edition of silences between tracks
* CD/DVD copy: can copy a CD/DVD to the hard drive
* can copy CD and DVD on the fly
* supports single-session data DVD
* supports any kind of CD
* Others: erase CD/DVD
* can save/load projects
* can burn CD/DVD images and cue files
* song, image and video previewer
* device detection thanks to HAL
* file change notification (requires kernel > 2.6.13)
* a customisable GUI (when used with GDL)
* supports Drag and Drop / Cut'n'Paste from nautilus (and others apps)
* can use files on a network as long as the protocol is handled by gnome-vfs
* can search for files thanks to beagle (search is based on keywords or on file type)
* can display a playlist and its contents (note that playlists are automatically searched through beagle)
* all disc IO is done asynchronously to prevent the application from blocking
Brasero Installation# yum -y install brasero
Binary Launch# brasero
Webshots

That's it, enjoy.
Related Readings:
Respin your own Linux distro
Linux Nero is Alive
Yet Another ISO Image Burner - GnomeBaker
Non-Related Post:
HowTo: Delete All Thumbs.db Recursively
HowTo: Find And Count JPG Files Recursively
Delete Zero-sized Filename Recursively
Find Hidden Linux File Recursively
Move Linux Files Recursively
Rename Linux File Recursively
Delete Files and Folders Recursively
Get Fedora

Thursday, January 31, 2008
HowTo: Brasero
HowTo: ISOs Management for Fedora
ISOMaster is an easy to use graphical CD image editor. Isomaster allows to extract files from an ISO, add files to an ISO, and create bootable ISOs (CD/DVD) - all in a graphical user interface. It can open ISO, NRG, and some MDF files but can only save as ISO.
ISOMaster Main Features
a. Create ISO
b. Edit/Modify ISO
c. Create bootable CD/DVD ISO
d. Save and burn ISO
Here's a quick entry on how to install an easy to use GUI CD image editor, ISOMaster.
ISOMaster Installation
# yum -y install isomaster
ISOMaster Binary Launch
# isomaster
Webshots
HowTo: Install Nmap with GUI FrontEnd
With old blog entry, here's how to have a GUI front-end for port and host scanning linux tool, Nmap. Port and host scanning via nmap is commonly done from linux terminal command line or CLI. If you wish to use nmamp with your X, here's an entry to do that.
As we all know, nmap is a free and opensource software used for network exploitation and security auditing. Using a combined usage of Zenmap and Umit, you can now have the power of Nmap right from your X desktop.
Here's a quick entry on how to have a multi-platform graphical Nmap and results viewer from your X.
Nmap Frontend Fedora 8 Installation
This package includes zenmap, a GTK+ frontend for nmap. The nmap package must be installed before installing nmap-frontend.
# yum -y install nmap-frontend nmap
Binary Launch
# nmapfe
Sample Screenshot:
License: BSD with advertising, BSD, GPLv2
That is all, enjoy.
HowTo: Create and Manage Genealogy Family Tree via Gramps
GRAMPS is a Free Software Project for Genealogy, offering a professional genealogy program, and a wiki open to all. It is a community project, created, developed and governed by genealogists.
Gramps genealogy software offers easy of use and easy navigation around different tree views of your family tree. Gramps' interface makes it fun and exciting managing your genealogy tree by offering end users to have direct control and manageability of family tree objects and object relations. Gramps adds more bookmarks management for easy quick access on family tree building and editing offering you to stay where you left on. Filters, search, and privacy features are also available from wide variety of selection view while viewing your geneaology tree.
Gramps also offers calendar and reports management extending genealogy feature power on unlimited tree objects with family tree decades and century ago. Calendar feature covers events, sources, dates, story, multimedia files and more. File links are also present from flat file and database for backend exports, compatibility and extensibility.
All in all, gramps is a very nice linux software to have from your desktop-based family tree (genealogy) management and creation.
Gramps Installation
Installation process via yum requires around 20MB of download from Fedora project repo.
# yum -y install gramps
Binary Launch
# gramps
Webshots


Tutorials, FAQs, documentation and features are all available here.
That is all, enjoy.
HowTo: Install KFTPGrabber FTP Client
KFTPgrabber is a graphical FTP client for the K Desktop Environment. KFTPGrabber implements many features required for usable FTP interaction. If you like KDE environment and you are looking for KDE-based FTP client software, here's a quick entry on how to install KFtpGrabber linux tool to your Fedora box.
Below are the known KFTPGrabber features as of this entry.
* Multiple simultaneous FTP sessions in separate tabs
* A tree-oriented transfer queue
* TLS/SSL support for the control connection and the data channel
* X509 certificate suppport for authentication
* FXP site-to-site transfer support
* One-time password (OTP) support using S/KEY, MD5, RMD160 or SHA1
* Site bookmarks with many options configurable per-site
* Distributed FTP daemon support (implementing the PRET command)
* Can use Zeroconf for local site discovery
* Bookmark import plugins from other FTP clients
* Support for the SFTP protocol
* A nice traffic graph
* Ability to limit upload and download speed
* Priority and skip lists using advanced filter rules
* Integrated SFV checksum verifier
* Direct viewing/editing of remote files
* Advanced default "on file exists" action configuration
* Filter displayed files/directories as you type
* Support for secure site-to-site transfers using SSCN
KFtpGrabber Installation
# yum -y install kftpgrabber
Binary Launch
# kftpgrabber
KFtpGrabber Webshots
That is all. Enjoy.
HowTo: Install FileZilla 3 on Fedora 8
Filezilla has come a long way both FTP software server and client base. To those who hasn't installed FileZilla FTP Client yet, here's how to install Filezilla to Fedora 8. And those who are still looking for alternative FTP client software for linux,besides from GFTP and KFtpGrabber, here's a quick entry on how to have Filezilla being installed to Fedora 8 box.
FileZilla FTP Client
FileZilla Client is a fast and reliable cross-platform FTP, FTPS and SFTP client with lots of useful features and an intuitive interface.
Filezilla Features
Among others, the features of FileZilla include the following:
* Easy to use
* Supports FTP, FTP over SSL/TLS (FTPS) and SSH File Transfer Protocol (SFTP)
* Cross-platform. Runs on Windows, Linux, *BSD, OSX and more
* Available in many languages
* Supports resume and transfer of large files >4GB
* Powerful Site Manager and transfer queue
* Drag & drop support
* Configurable Speed limits
* Filename filters
* Network configuration wizard
Source: Filezilla
Filezilla Installation# yum -y install filezilla
Binary Launch# filezilla
Filezilla Screenshots
That is all.Enjoy.
Related Readings:
Data Transfer Using Wget
Data Bandwidth Shaper Installation
Image Retrieval Using Wget
Wednesday, January 30, 2008
HowTo: Be Alerted via Popups When Monitoring Log Files
Do you need a desktop popup alert when somebody is trying to bruteforce your SSH service?
How to be alerted from X Desktop when specific matching words appears from specific logs?
How to popup an alert when matching phrases are met from log files?
A quick entry on how to be alerted from X windows via popups when monitoring log files without opening a browser monitoring page, viewing graphs, viewing log files and reading email alerts.
MetaMonitor is a simple program written for KDE, which watches the syslog's or metalog's log file and pops up the window whenever the new message comes. You can specify the log file to watch, popup trigger settings and matching regular expressions for parsing log lines, so you can watch other than log files too.
In other words, MetaMonitor is a linux tool which watches specific or customized log files and pops up the window whenever the new matching alert message comes.
Here are some key features of "MetaMonitor":
· Ability to monitor Syslog's, Metalog's or custom file
· Ability to change default regular expression for parsing the logline
· Ability to change interval between single file checks
· Ability to communicate via DCOP
· Ability to configure popups (groupping, lifetime)
Metamonitor Installation
To install metamonitor, simply install it using yum .
# yum -y metamonitor
After successful installation, metamonitor appears from Application/System. You can call metamonitor binary by issuing
# metamonitor
Popup Alert for SSH Failed Attempts
You can use this metamonitor to monitor your SSH lof file. Say you want to be alerted for any refused SSH connections, simply follow these simple steps.
1. Enter a matching phrase of for specific message like
refused
2. Specify SSH log file like
/var/log/secure
3. Choose any other trigger alert, message, appearance and alert themes.
Now, try to connect from another box going to your linux box via ssh. That box should not be authorized for any ssh connections.
That's all.
PopUp Screenshot
Sample MetaMonitor Option ScreenShot
More Screenshot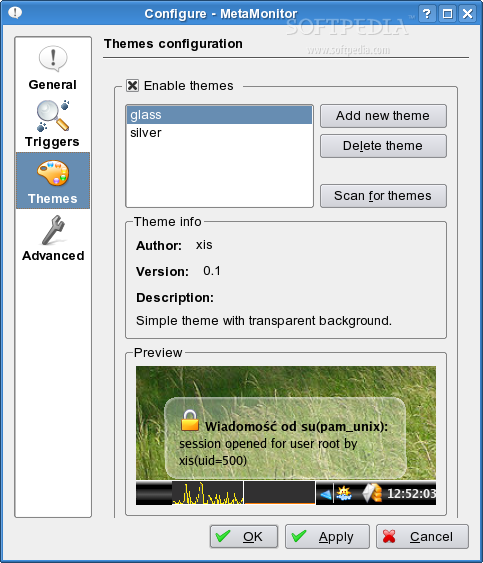
Enjoy.
Monday, January 28, 2008
HowTo: Mount Windows Drive From Linux GUI
Are you searching for Network Neighborhood from your linux desktop? Have you been wondering how you can map a shared windows network drive from your linux desktop using GUI?
Here's another simple linux desktop howto on mapping shared windows folder from linux desktop.
There are lots of way to achieve and map a shared windows folder from linux box. Here's one way to do it using one of the KDE linux tools.
Make sure you have installed KDE Network Manager package. Simply install like so
# yum -y install kdebase
This KDE base package installs a lot of KDE linux tools you can use of. One of them is knetattach. KDE net attach tool functions to map shared directory folder or remote location from your linux desktop. KDE Net attach lets you connect and mapped network folder from different locations namely shared webfolder (webdav), ftp folder, windows shared drive/folder, ssh and more.
Now, to map a shared windows drive and/or folder from linux desktop, simply launch KDE NetAttach linux tool
# knetattach
Select windows network drive and supply the missing username, password and shared folder name. You have an option to create a shortcut icon of this action as well.
That's it. Enjoy
HowTo: Delete Files With 0K Filesize Recursively
I have been asked to post a command or script by a newbie user on how he can delete all files with 0K or zero filesize recursively.
This is a quick entry on how to delete files with 0K (zero) filesize and optionally do it recursively.
A precaution. First, deleting files recursively in linux is dangerous unless you know what you are doing. Here's one way on how to delete files with zero file size recursively.
Assuming our target directory is /tmp and we wish to delete all zero-sized regular files inside that /tmp folder
First, search files with sero-sized filesize that needs to be deleted
# find /tmp -size 0c
This can confirm if the search results produced by the above command are correct. The above command lists out results including special files, special blocks, devices and lock files that has zero file size. This is the chance to verify if the above command would include any important files that you might have from the search directory folder.
Let us add more searcg filters to the search query by filtering out to show regular files with zero file size only.
Searching with regular file filter using find
# find /tmp -size 0c -type f
If we are satisfied with the results produced by the above command, we can now proceed on deleting those search results returned by the above command. This can be done by appending the file delete command with the find command like so
Search and delete recursively
# find /tmp -size 0c -type f -exec rm -rf {} \;
The above commands totally deletes all files with zero filesize (0K) without any prompts. Be careful with this command as you don't want to delete special device, files and lock files from your linux box.
Enjoy.
Monday, January 21, 2008
HowTo: Changing Interface's MTU Size
Wiki defines MTU as
In computer networking, the term Maximum Transmission Unit (MTU) refers to the size (in bytes) of the largest packet that a given layer of a communications protocol can pass onwards. MTU parameters usually appear in association with a communications interface (NIC, serial port, etc.). The MTU may be fixed by standards (as is the case with Ethernet) or decided at connect time (as is usually the case with point-to-point serial links). A higher MTU brings higher bandwidth efficiency. However, large packets can block up a slow interface for some time, increasing the lag for further packets. For example, a 1500 byte packet, the largest allowed by Ethernet at the network layer (and hence most of the Internet), would tie up a 14.4k modem for about one second.
Default MTU Size for Different Network Topology
Network MTU(Bytes)
-----------------------------------------------
16 Mbit/Sec Token Ring 17914
4 Mbits/Sec Token Ring 4464
FDDI 4352
Ethernet 1500
IEEE 802.3/802.2 1492
X.25 576
-----------------------------------------------
Now, here's a quick entry on how to change your network interface's MTU size
Changing MTU Size
To check for your current eth0 interface's MTU size, simply
# ifconfig eth0 | grep MTU
The aboves gives you similar lines like this
~~~~~~~~~~~~~~~~~~~~~~~~~~~~~~~~~~~~~~~~~~~~~~~~~~~~~~~~~~~~~~~~~~~
UP BROADCAST RUNNING MULTICAST MTU:1500 Metric:1
~~~~~~~~~~~~~~~~~~~~~~~~~~~~~~~~~~~~~~~~~~~~~~~~~~~~~~~~~~~~~~~~~~~
To change your interface's MTU size from 1500 to 1492, simply
# ifconfig eth0 mtu 1492
Verify that the above command was executed successfully by checking the interface's MTU size again
# ifconfig eth0 | grep MTU
Result:
~~~~~~~~~~~~~~~~~~~~~~~~~~~~~~~~~~~~~~~~~~~~~~~~~~~~~~~~~~~~~~~~~~~
UP BROADCAST RUNNING MULTICAST MTU:1492 Metric:1
~~~~~~~~~~~~~~~~~~~~~~~~~~~~~~~~~~~~~~~~~~~~~~~~~~~~~~~~~~~~~~~~~~~
The above changes is temporary.
Making MTU Changes Permanently
To make the current MTU size permanent between reboots, simply append the below lines into your /etc/sysconfig/network-scripts/ifcfg-eth0 file for eth0 interface
MTU=1492
and restart your network service
# service network restart
The above line is for your eth0 config file. Change when needed.
Enjoy.
Related Articles:
KDE Network Interface Monitoring Tool
IbMonitor - Interface and Bandwidthd Monitoring Tool
IpTraf - Bandwidthd, Packets, and Ports LAN Monitoring Tool
Traffic Monitoring GNOME Applet
HowTo: Create Vanishing Virtual Drive
You can work with your hard drives, network drives and other external or USB storage devices accomplishing critical linux hacks. Yes, technology nowadays have enabled us to make use of larger and more stable storage capacity drives and devices. Most firms and company services enjoy the benefits of having them as part of their IT infrastructure. What's good of having them are your data is still there between system reboots.
Here's a quick entry on how to create Read Access Memory (RAM) disk from Fedora.
What is RAM Disk
A RAM disk is a portion of Read Access Memory (RAM) which is temporarily used as if it were a disk drive. RAM disks have fixed sizes, and can be mounted like regular disk partitions. RAM disks can be a great place to store temporary data for temporary task.
Additionally, one advantage of having RAM disk is that access time with RAM disk is much faster than for physical disk. However, RAM disk is volatile type of disk. Any data stored on a RAM disk will be lost after shutting down the system or powering off. Another issue of having RAM disk is that RAM memory allocated as RAM disk would no longer be available for application's usage from system's overall memory capacity.
Creating RAM Disk
By default, kernel 2.4.x and kernel 2.6.x supports RAM disk. Fedora by default supports 16 RAM disks from ram0 to ram15 as shown below and assigns them with default 16MB RAM of disk size when mounted.
# ls -la /dev/ram*
~~~~~~~~~~~~~~~~~~~~~~~~~~~~~~~~~~~~~~~~~~~~~~~~~~~~~~~~~~~~~~~~~~~~~
lrwxrwxrwx 1 root root 4 2008-01-21 07:56 /dev/ram -> ram1
brw-r----- 1 root disk 1, 0 2008-01-21 12:02 /dev/ram0
brw-r----- 1 root disk 1, 1 2008-01-21 07:56 /dev/ram1
brw-r----- 1 root disk 1, 10 2008-01-21 07:56 /dev/ram10
brw-r----- 1 root disk 1, 11 2008-01-21 07:56 /dev/ram11
brw-r----- 1 root disk 1, 12 2008-01-21 07:56 /dev/ram12
brw-r----- 1 root disk 1, 13 2008-01-21 07:56 /dev/ram13
brw-r----- 1 root disk 1, 14 2008-01-21 07:56 /dev/ram14
brw-r----- 1 root disk 1, 15 2008-01-21 07:56 /dev/ram15
brw-r----- 1 root disk 1, 2 2008-01-21 07:56 /dev/ram2
brw-r----- 1 root disk 1, 3 2008-01-21 07:56 /dev/ram3
brw-r----- 1 root disk 1, 4 2008-01-21 07:56 /dev/ram4
brw-r----- 1 root disk 1, 5 2008-01-21 07:56 /dev/ram5
brw-r----- 1 root disk 1, 6 2008-01-21 07:56 /dev/ram6
brw-r----- 1 root disk 1, 7 2008-01-21 07:56 /dev/ram7
brw-r----- 1 root disk 1, 8 2008-01-21 07:56 /dev/ram8
brw-r----- 1 root disk 1, 9 2008-01-21 07:56 /dev/ram9
lrwxrwxrwx 1 root root 4 2008-01-21 07:56 /dev/ramdisk -> ram0
~~~~~~~~~~~~~~~~~~~~~~~~~~~~~~~~~~~~~~~~~~~~~~~~~~~~~~~~~~~~~~~~~~~~~
You can check if your current linux kernel supports RAM by issuing
# dmesg |grep RAM
You should be seeing similar lines like this
~~~~~~~~~~~~~~~~~~~~~~~~~~~~~~~~~~~~~~~~~~~~~~~~~~~~~~~~~~~~~~~~~~~~~~
BIOS-provided physical RAM map:
RAMDISK driver initialized: 16 RAM disks of 16384K size 4096 blocksize
~~~~~~~~~~~~~~~~~~~~~~~~~~~~~~~~~~~~~~~~~~~~~~~~~~~~~~~~~~~~~~~~~~~~~~
Format RAM Disk for Initialization
Now, let us start using a single RAM disk and format it.
# mkfs.ext3 /dev/ram0
Alternatively, RAM disk creation without a journalized file system would be
# mke2fs -m 0 /dev/ram0
Mounting RAM Disk
Create a temporary mounting point
# mkdir /mnt/ram
Mount RAM disk
# mount /dev/ram0 /mnt/ram
Operate on RAM disk such as copying file
# cd /mnt/ram
# cp /bin/ls .
Congratulations! You have just created a single 16MB RAM disk which is only available from your current CPU session. This RAM disk would vanish when you shutdown or reboot your system.
If you wish to take a look more of your RAM disk details, simply
# tune2fs -l /dev/ram0
Change Default RAM Size
If you wish to overwrite linux default RAM disk size, you can pass RAM size parameter to linux kernel during reboot. This can be accomplished by editing your /etc/grub.conf and append the below line to the kernel parameter
ramdisk_size=4000
Well, a linux tip to make your RAM disk allocation permanent is to include it on one of your startup script or to /etc/rc.local. This approach would mount RAM disk permanently between reboots though the old data would not be there.
Hope you find this interesting, enjoy.
Related Article:
Mounting and Burning ISO Images, Burning DVD/CD Images
HowTo: Add New HardDisk to Linux
Optimize Your HardDisk Read Performance
HowTo: NTFS Drive to Linux
TestDisk - Linux Partitioning Tool
Sunday, January 20, 2008
HowTo: Install Identity.pub Into Remote Machines
Installing identity.pub from your local machine into a remote machine can be done in a fewer keystrokes using ssh-copy-id. This ssh-copy-id linux command has been used as one of the few linux commands here but it's usage has never been emphasized and explained.
This quick entry covers on how to facilitate identity.pub remote transfers and installationbetween machines using ssh-copy-id.
What is ssh-copy-id?
ssh-copy-id is a script that uses ssh to log into a remote machine (presumably using a login password, so password authentication should be enabled, unless you’ve done some clever use of multiple identities)
ssh-copy-id also changes the permissions of the remote user’s home, ~/.ssh, and ~/.ssh/authorized_keys to remove group writability (which would otherwise prevent you from logging in, if the remote sshd has StrictModes set in its configuration).
Remote Installation of Identity.pub File
How to transfer your identity.pub into a remote machine's authorized_keys?
cd back to your home ssh folder
# cd ~/.ssh
Assuming we need to transfer id_rsa.pub to a remote host, simply
# ssh-copy-id -i id_rsa.pub remote-user@remote-host
The above line would transfer id_rsa.pub identity public file into the remote host. The contents of id_rsa.pub would then be added or appended to authorized_keys file from remote machine. If authorized_keys file does not exist, it will automatically be created. This authorized_keys file is located under remote host default home location inside the hidden .ssh folder.
Legend:
~~~~~~~~~~~~~~~~~~~~~~~~~~~~~~~~~~~~~~~~~~~~~~~~~~~~~~~~~~~~~~~~~~~~~~~~~~~~~~~~~~~
remote-user required; an existing and active user account from remote machine
remote-host required; remote machine/host, could be a valid host name or IP address
id_rsa.pub required; your public identity RSA file
~~~~~~~~~~~~~~~~~~~~~~~~~~~~~~~~~~~~~~~~~~~~~~~~~~~~~~~~~~~~~~~~~~~~~~~~~~~~~~~~~~~
You can do this over and over again with all your linux box, servers and workstations.
The above process can also be done manually without using ssh-copy-id script. The only difference is that transfer of id_rsa.pub contents into authorized_keys file would be manually added by simply editing or creating the authorized_keys file.
Enjoy.
More Articles:
HowTo: Passwordless SSH
HowTo: Passphraseless and Passwordless SSH
Saturday, January 19, 2008
HowTo: Check and Mark Bad Block Of Hard Disk
I just plugged my old harddrive into my existing linux box and it has been long time since I last used this spare harddisk of mine. I just felt the need to check for an old rpm spec file this hardddrive.
Now, here's a quick blog entry on how to check your harddisk for possible bad blocks and mark them those badblocks along the way.
What is e2fsck?
e2fsck is used to check a Linux second extended file system (ext2fs). E2fsck also supports ext2 filesystems containing a journal, which are also sometimes known as ext3 filesystems, by first applying the journal to the filesystem before continuing with normal e2fsck processing. After the journal has been applied, a filesystem will normally be marked as clean. Hence, for ext3 filesystems, e2fsck will normally run the journal and exit, unless its superblock indicates that further checking is required.
Steps To Check Your Hard Disk For Bad Blocks
1. Unmount the hard drive that needs to be checked. Assuming the mounted secondary hard drive is /dev/sda1
# umount /dev/sda1
2. Proceed to check for possible harddisk bad blocks using e2fsck
# e2fsck -c /dev/sda1
Time for coffee break. This might take a while depending on your hard drive capacity.
Happy weekend and enjoy.
Your comments are always welcome here.
Related Readings:
Hard disk Monitoring using SmartCtl
HowTo: Install Linux Hardware Browser
Tired of looking your detailed hardware configuration specs? Forgot those command line commands to identify your devices and hardware specs?
Here's a GUI based hardware browser that displays your current hardware specifications and profile with no fuzzy and administrative menu. Hwbrowser shows all your hardware specifications including hard drive controllers, sound and video cards, network and USB devices, attached storage devices and so on.
Hardware Browser - HwBrowser Installation
Fedora supports installation of hwbrowser via yum. To install hwbrowser, simply issue
# yum -y install hwbrowser
that downloads around 107K of package size.
Though this hwbrowser linux tool does not provide any further menus like options to remove hardware devices, edit hardware drivers, disable interrupts, or any other administrative hardware functions - hwbrowser simply displays all those hardware specifications currently being seen from your CPU and devices.
Binary Launch
# hwbrowser
Enjoy.
Hwbrowser ScreenShot:
Related Reading:
Alternative Hardware Devices Viewer
Linux Hardware and Software Clock
CD/DVD Drive Technical Specifications
Speed Up your Hard Drive
Friday, January 18, 2008
HowTo: Basic RPM Package Queries And Usage
RPM has been the standard binary for querying packages from RedHat and any other rpm-based OS like CentOS, WhiteBox, Fedora, Mandriva, Blag and 60+ more.
As a refresher, here are some basic patterns on how to query rpm packages using rpm package manager.
To search rpm database for all package that contains sendmail
# rpm -qa sendmail
To query rpm database for package with particular string
# rpm -qa | grep mail
Note that rpm package manager is a little bit sensitive on query search. The below might confuse you when doing a rpm query for SENDMAIL
# rpm -qa SENDMAIL
To query rpm database for specific package
# rpm -q sendmail
To install a particular rpm package
# rpm -ivh yum-2.4.0-2.noarch.rpm
To upgrade a currently installed rpm package
# rpm -Uvh yum-2.4.0-2.noarch.rpm
To query rpm database for rpm package info, package details, package size, package group, package version, source and more
# rpm -qi sendmail
To import public key using rpm
# rpm --import public-key
To install multiple rpm package
# rpm -ivh yum-2.4.0-2.noarch.rpm sendmail-8.13.4-2.i386.rpm
To query for package configuration files
# rpm -qc sendmail-8.13.8-2
To query for state of package files from package name
# rpm -qs sendmail
To query for package capabilities
# rpm -q --provides sendmail
To query for package requirements
# rpm -q --requires sendmail
To query rpm database for provided package
# rpm -q --whatprovides sendmail
To customize query result when doing query search
# rpm -q --queryformat '%{NAME}%{VERSION}%{RELEASE}\n' sendmail
To query rpm database with verbosity
# rpm -qavv sendmail
To query rpm database for files included with the package
# rpm -ql sendmail
There are a lot more rpm parameter we can ask rpm to give to us as the rpm package manager is a powerful commandline-driven package manager there is in Redhat-based linux distro. You can see more of rpm parameter flags by issuing rpm without any parameters like so
# rpm
Enjoy.
HowTo: Rebuild Locked Out RPM Database
Every time you query rpm database against your rpm package manager, your linux terminal and query seems to hang and you cannot do something about it except try to kill and terminate the current rpm query process.
One probable cause for this could be a recent rpm query was unexpectedly terminated by hitting Control+C, that left rpm on a inaccurate state or rpm stale lock status. RPM when terminated unexpectedly cannot flush out pending query jobs from it thus, leaving rpm database with an inaccurate rpm database lock state.
Repair RPM Database Files
Take a look at rpm database usually found here from Fedora box
# cd /var/lib/rpm
# ls -la
You will see similar lines like these
~~~~~~~~~~~~~~~~~~~~~~~~~~~~~~~~~~~~~~~~~~~~~~~~~~~~~~~~~~
-rw-r--r-- 1 root root 24576 2008-01-18 17:05 __db.001
-rw-r--r-- 1 root root 1318912 2008-01-18 17:05 __db.002
-rw-r--r-- 1 root root 450560 2008-01-18 17:05 __db.003
~~~~~~~~~~~~~~~~~~~~~~~~~~~~~~~~~~~~~~~~~~~~~~~~~~~~~~~~~~
First step on repairing rpm database is to kill the process of the defunct and currently running rpm binary.
Proceed to repairing by killing the defunct rpm PIDs and deleting the rpm database, like so
# ps axuw | grep rpm
~~~~~~~~~~~~~~~~~~~~~~~~~~~~~~~~~~~~~~~~~~~~~~~~~~~~~~~~~~~~~~~~~~
root 15294 3.2 15.1 164960 /usr/bin/python /usr/bin/yum -y install whatever
~~~~~~~~~~~~~~~~~~~~~~~~~~~~~~~~~~~~~~~~~~~~~~~~~~~~~~~~~~~~~~~~~~
Kill the pending rpm process ID
# kill -9 15294
Delete the rpm package database files
# rm -rf /var/lib/rpm/__db.00*
Now try to do another rpm query
# rpm -qa whichever
This should fix the problem and rpm should reply with your query.
If the problem still exists, you can rebuild your rpm database by simply issuing the rpm database rebuilddb parameter like so
# rpm --rebuilddb
A more verbosed rpm database rebuild would be
# rpm -vv --rebuilddb
It would take some time though that should fix it. Then after, list out again the rpm files
# ls -la /var/lib/rpm
~~~~~~~~~~~~~~~~~~~~~~~~~~~~~~~~~~~~~~~~~~~~~~~~~~~~~~~~~~~~~~~~~~~~~
-rw-r--r-- 1 root root 24576 2008-01-18 17:05 __db.001
-rw-r--r-- 1 root root 1318912 2008-01-18 17:05 __db.002
-rw-r--r-- 1 root root 450560 2008-01-18 17:05 __db.003
~~~~~~~~~~~~~~~~~~~~~~~~~~~~~~~~~~~~~~~~~~~~~~~~~~~~~~~~~~~~~~~~~~~~~
If all still fails, you need to do the above commands under linux single mode, which brings out another issue of rebooting your server box. Usually, the above does the trick, I never experienced booting to single mode just to have my rpm database rebuilt.
Enjoy.
HowTo: Display RPM Packages Installed Last Month
I have been posting rpm samples but have not posted anything about rpm description, so here goes the man page.
rpm is a powerful Package Manager, which can be used to build, install, query, verify, update, and erase individual software packages. A package consists of an archive of files and meta-data used to install and erase the archive files. The meta-data includes helper scripts, file attributes, and descriptive information about the package. Packages come in two varieties: binary packages, used to encapsulate software to be installed, and source packages, containing the source code and recipe necessary to produce binary packages.
Now the scenario comes in.
You went on leave for about a month leaving your co-sysads working with your server. Later on, you came back to report on duty. Without asking too much questions and reading too much documented emails and files, the questions in your mind of what rpm package was installed during the time that you were out and enjoying the vacation?
The scenario could be accomplished by querying and using the rpm package manager.
List Out and Display RPM Package That Was Installed Recently
Today is January. You wish to know those rpm package name that was installed last December 2007.
Here we go.
First, the basics.
Display the install date and time of every existing rpm package name from the box.
# rpm -qa --qf "%{INSTALLTIME:date} %{NAME}\n"
The above would display all the rpm package available from the rpm database.
Now, here's the catch.
Simply use grep to filter out those packages installed last month. For this case, December 2007.
# rpm -qa --qf "%{INSTALLTIME:date} %{NAME} - ( %{FILESIZES} bytes) \n" | grep 2007 | Dec
The above command displays all rpm packages installed via rpm done last December 2007 including the rpm package file size.
Sample Results:
~~~~~~~~~~~~~~~~~~~~~~~~~~~~~~~~~~~~~~~~~~~~~~~~~~~~~~~~~~~~~~~~~~~~~~~~~~~~~
Sat 01 Dec 2007 02:32:15 PM WAT pwgen - ( 19084 bytes)
Wed 05 Dec 2007 08:45:15 AM WAT plotutils - ( 16768 bytes)
Wed 19 Dec 2007 11:47:24 AM WAT hippo-canvas - ( 25 bytes)
Wed 05 Dec 2007 07:52:46 AM WAT thunderbird - ( 2257 bytes)
Wed 05 Dec 2007 08:45:18 AM WAT ImageMagick-c++ - ( 21 bytes)
Wed 19 Dec 2007 11:47:28 AM WAT gnome-python2-gnomedesktop - ( 4096 bytes)
Wed 05 Dec 2007 07:40:28 AM WAT gnome-utils - ( 42438 bytes)
Wed 05 Dec 2007 08:04:33 AM WAT kudzu - ( 1406 bytes)
Wed 05 Dec 2007 08:45:13 AM WAT perl-DateManip - ( 4096 bytes)
Wed 05 Dec 2007 07:09:07 AM WAT flash-plugin - ( 4096 bytes)
Wed 05 Dec 2007 07:52:59 AM WAT fedora-logos - ( 7459 bytes)
Wed 05 Dec 2007 08:45:12 AM WAT perl-XML-DOM - ( 4096 bytes)
Wed 05 Dec 2007 08:45:19 AM WAT perl-XML-XQL - ( 7743 bytes)
Wed 19 Dec 2007 11:46:48 AM WAT gnome-python2-libwnck - ( 47556 bytes)
Mon 03 Dec 2007 12:13:37 PM WAT VirtualBox - ( 3117 bytes)
~~~~~~~~~~~~~~~~~~~~~~~~~~~~~~~~~~~~~~~~~~~~~~~~~~~~~~~~~~~~~~~~~~~~~~~~~~~~~
If the package was installed using yum, you could also take a look at /var/log/yum.log* log files.
Similarly, accomplishing the same task by viewing yum log files would be
# cat /var/log/yum.log* | grep 2007 | grep Dec
Sniffed sample results
~~~~~~~~~~~~~~~~~~~~~~~~~~~~~~~~~~~~~~~~~~~~~~~~~~~~~~~~
Dec 07 22:06:36 Installed: sysstat - 7.0.4-3.fc8.i386
Dec 07 22:06:36 Installed: gamin-devel - 0.1.9-4.fc8.i386
~~~~~~~~~~~~~~~~~~~~~~~~~~~~~~~~~~~~~~~~~~~~~~~~~~~~~~~~
Remember yum -y update ? Take note that yum can also log any rpm packages being updated via yum like the logs shown below
~~~~~~~~~~~~~~~~~~~~~~~~~~~~~~~~~~~~~~~~~~~~~~~~~~~~~~~~
Dec 07 22:02:40 Updated: tzdata-java - 2007k-1.fc8.noarch
Dec 07 22:02:45 Updated: tzdata - 2007k-1.fc8.noarch
~~~~~~~~~~~~~~~~~~~~~~~~~~~~~~~~~~~~~~~~~~~~~~~~~~~~~~~~
Hope this helps.
Related Words:
Identify Which RPM Package a Binary, a File or a Folder Belongs To or Owned By
HowTo: Display and List Out All Package Files Recently Installed
With a pending project at hand, system admin A installed mod_ssl, and after a while sysad A resigned and left. You take over and found out that mod_ssl was recently installed with a pending configuration job. The mod_ssl is just a new thing for you and your experience. But you need to continue a pending configuration job regarding mod_ssl service.
The problem is, since the package name is just new thing for you, you are not aware of all the files belonging to that new rpm package name, how would you continue the pending job considering those thousand files that exist from the box?
Here's how to accomplish the above task of determining and listing out all files that belonged to a package from Fedora box.
Display and List out Files Belonged to A Package
Given with the example, here's the basic steps to achieve that scenario.
Simply issue the next few commands.
# rpm -qa mod_ssl
brings out the package name
~~~~~~~~~~~~~~~~~~~~~
mod_ssl-2.2.6-3
~~~~~~~~~~~~~~~~~~~~~
Next, identify the package files that was installed from this package name
# rpm -ql mod_ssl-2.2.6-3
lists out all the package files
~~~~~~~~~~~~~~~~~~~~~~~~~~~~~~~~~~~~~~~~~~
/etc/httpd/conf.d/ssl.conf
/usr/lib/httpd/modules/mod_ssl.so
/var/cache/mod_ssl
/var/cache/mod_ssl/scache.dir
/var/cache/mod_ssl/scache.pag
/var/cache/mod_ssl/scache.sem
~~~~~~~~~~~~~~~~~~~~~~~~~~~~~~~~~~~~~~~~~~
Now, you can start creating a backup copy of configuration file before you can continue to work on the pending job handed over to you by previous person doing your current job. At least, you can start on something here.
If you still don't know what to do, might as well check out some do's and dont's with the package.
Enjoy.
HowTo: Identify Source Package Name Of A File or Folder
Here's a way to identify from which program package a file belongs to or which package a directory folder belongs to or created from? That is, which package name installed and created a particular package file?
Supposed that you encounter a file name lying a round from some directory and the file looks like unfamiliar to your mind's file list. And you are aware that this file is part of an application package currently installed from your box, and you just can't identify which package name was that file belongs to.
Identify From Which Package Name a File Belongs To
I am taking for an example, say /etc/named.conf . Let us determine which package name this file belongs to. Here's how to accomplish this task, simply issue
# rpm -qf /etc/named.conf
Result:
~~~~~~~~~~~~~~~~~~~~~~~
bind-9.5.0-22.b1.fc8
~~~~~~~~~~~~~~~~~~~~~~~
Another example
# rpm -qf /etc/pango/pangox.aliases
Result:
~~~~~~~~~~~~~~~~~~~~~~~
pango-1.18.3-1.fc8
~~~~~~~~~~~~~~~~~~~~~~~
The command normally shows the package name where the file belongs to and the package version and distro version from which the package was compiled for.
# rpm -qf /etc/sysconfig/netconsole
~~~~~~~~~~~~~~~~~~~~~~
initscripts-8.60-1
~~~~~~~~~~~~~~~~~~~~~~
Sure you get the idea.
Identify From Which Package Name a Directory Folder Belongs To
Now, how to get the package name a folder belongs to you asked? The concept should be the same, using rpm to query the package name a directory folder belongs to? That is, which package created and installed an existing folder from your box?
Some interesting examples.
# rpm -qf /dev/shm
# rpm -qf /var/named/chroot/etc/
# rpm -qf /dev/null
Identify From Which Package Name A Binary is Part of
# rpm -qf /usr/bin/whoami
# rpm -qf `which whoami`
Result:
~~~~~~~~~~~~~~~~~~~~~~~~
coreutils-6.9-12.fc8
~~~~~~~~~~~~~~~~~~~~~~~~
Carry on.
Some Readings:
Kernel Devel Headers HowTo
More Multimedia Plugins HowTo
Fedora and RHEL Differences
Microsoft Fonts on Fedora 8 HowTo
Livna Repository on Fedora 8 HowTo
HowTo: Delete Extra Spaces Between Words From Files
Have you encountered a text file full of words separated by multiple extra space between words? Mostly, these files are caused by data export mechanism by some application processing software.
Now, here's how to remove and delete those multiple and extra spaces between words of a file.
# cat testfile.txt
~~~~~~~~~~~~~~~~~~~~~~~~~~~~~~~~~~~~~~~~~~~~~~~~~~~~~~~~~~~~~~~~~~~~~~~~~~~~~~
Tomboy is a desktop note-taking application for Linux and Unix. Simple and easy to use, but with potential to help you organize the ideas and information you deal with every day.
Tomboy usefulness lies in the ability to relate notes and ideas together, using a WikiWiki-like linking system.
~~~~~~~~~~~~~~~~~~~~~~~~~~~~~~~~~~~~~~~~~~~~~~~~~~~~~~~~~~~~~~~~~~~~~~~~~~~~~~
Here's its equivalent captured image of the above testfile.txt as blogger would definitely remove thos cluttered space characters in between the above words. To have a wider view of the testfile with extra space, see below image.
Now, let us remove those multiple cluttered spaces in between words.
# cat testfile.txt | tr -s " "
Alternatively
# tr -s " " < testfile.txt
Result:
~~~~~~~~~~~~~~~~~~~~~~~~~~~~~~~~~~~~~~~~~~~~~~~~~~~~~~~~~~~~~~~~~~~~~~~~
Tomboy is a desktop note-taking application for Linux and Unix. Simple and easy to use, but with potential to help you organize the ideas and information you deal with every day.
Tomboy usefulness lies in the ability to relate notes and ideas together, using a WikiWiki-like linking system.
~~~~~~~~~~~~~~~~~~~~~~~~~~~~~~~~~~~~~~~~~~~~~~~~~~~~~~~~~~~~~~~~~~~~~~~~
Congrats, you have now suppressed multiple extra space between words of a text file.
Enjoy.
Related Readings:
Tr Linux Command Explained
Remove Space Character from Filenames
HowTo: Find Hidden Directory Folders Recursively
The title says it all, how to find hidden directory folders recursively.
There are times we need to list down all hidden directories from a file system or display all hidden directory folder from a client home folder, this task can simply be done using linux find command.
How to find hidden directory folder recursively?
Let us create hidden directory folders that starts with dot (.) before their name
# mkdir /tmp/.hidden1
# mkdir /tmp/.hidden2
Now, let us find the newly created hidden folder
# find /tmp -name '.*' -type f
Result:
~~~~~~~~~~~~~~~~~~~~~~~~
/tmp/.hidden1
/tmp/.hidden2
~~~~~~~~~~~~~~~~~~~~~~~~
Apply to a client's request named customerA
# find ~customerA -name '.*' -type f
Result:
~~~~~~~~~~~~~~~~~~~~~~~~~~~~~~~~~~~~~~~~~~~~~~~~~~~~~~~~~~
/home/customerA/.ICEauthority
/home/customerA/.kde/Autostart/.directory
/home/customerA/.bashrc
/home/customerA/.bash_history
/home/customerA/.bash_profile
/home/customerA/.xsession-errors
/home/customerA/.bash_logout
/home/customerA/.gtk-bookmarks
/home/customerA/.zshrc
/home/customerA/.htaccess
/home/customerA/.dmrc
/home/customerA/.gnome/gnome-vfs/.trash_entry_cache
/home/customerA/.pulse-cookie
/home/customerA/.gtkrc-1.2-gnome2
/home/customerA/.tomboy.log
~~~~~~~~~~~~~~~~~~~~~~~~~~~~~~~~~~~~~~~~~~~~~~~~~~~~~~~~~~
Enjoy.
Related Readings:
List Out Hidden Directory Folder and Files
Rename Multiple Files Recursively
Create Hidden Directory Folder
HowTo: Create Hidden Directory Folder
From linux command line terminal, here's a quick tip on creating a hidden directory folder from your hard drive.
Simply issue the following to create a hidden directory from linux terminal window.
Let us do it from temporary folder
# cd /tmp
Then create the hidden directory folder
# mkdir .hideme
Go inside the hidden directory folder
# cd .hideme
# ls -la
Create files under a hidden directory folder
# cd .hideme
# vi file1
# touch file2
# cp /tmp/*.txt /tmp/.hideme
Logically, the created files under a hidden directory folder are also hidden by default ls command parameters.
There you go, enjoy.
HowTo: Print Only Lines of Text File with N characters
Let us assume we have a large text configuration file, and we need to display and print ONLY the lines that has more than 20 characters per line, how can we do that from command line terminal?
Selective Display of Lines From Text File
Here's how to print the lines of a text file that only exceeds the specified N characters.
Say an example text file.
# cat testfile.txt
Result:
~~~~~~~~~~~~~~~~~~~~~~~~~~~~~~~~~~~~~~~~~~~~
1234567890
1234567890123456789012345
welcome to ilovetux.com
the quick red cat jump over the black hole
abc
abcde
~~~~~~~~~~~~~~~~~~~~~~~~~~~~~~~~~~~~~~~~~~~~
To print ONLY the lines that has at least 20 characters per line, this could be done like so
# cat testfile.txt | awk 'length > 19'
Result:
~~~~~~~~~~~~~~~~~~~~~~~~~~~~~~~~~~~~~~~~~~~~
1234567890123456789012345
welcome to ilovetux.com
the quick red cat jump over the black hole
~~~~~~~~~~~~~~~~~~~~~~~~~~~~~~~~~~~~~~~~~~~~
Enjoy.
Related Readings:
Print and Display Leading or Trailing Lines from Text File
Display FileName Extension Only
Deleting New and Return Lines from Text File
HowTo: Sort Files by FileSize and What Else?
If you have thousands of email users and you wish to get email alerts of the top 10 largest mail box users from your email without using any other external linux software, here's how to accomplish this task. This task can also be used to check for top largest files of your hard drive from linux terminal command line.
Basically, in order to determine the top or the largest ones, we need to cover first how to sort files by their filesizes. This is the first basic step to determine the largest mail box user or the largest filesize from the rest of the list.
Considering that database is not part of your mail server, consider this approach to determine your largest file from your hard drive or top mail box users on flat file email system.
Sorting Files by FileSizes
By issuing the below command, you get to display sorted files from highest to lowest order
# cd /var/mail
# ls -lS
~~~~~~~~~~~~~~~~~~~~~~~~~~~~~~~~~~~~~~~~~~~~~~~~~~~~~~~~~~~~~~~~~~~~~~~~~~~
-rw------- 1 rtolosa mail 899999958 Jan 18 11:41 rtolosa
-rw------- 1 ayusuf mail 899999937 Jan 18 11:41 ayusuf
-rw------- 1 aaluko mail 899999916 Jan 18 11:41 aaluko
-rw------- 1 emarquez mail 899999713 Jan 18 11:41 emarquez
-rw------- 1 aogiri mail 899999617 Jan 18 11:41 aogiri
-rw------- 1 psmith mail 899999599 Jan 18 11:41 psmith
..
<..snipped>
...
~~~~~~~~~~~~~~~~~~~~~~~~~~~~~~~~~~~~~~~~~~~~~~~~~~~~~~~~~~~~~~~~~~~~~~~~~~~
Alternatively, one quick and dirty approach that would give you the same above result would be
# ls -l | sort -k5 -nr
or
# ls -ls /var/spool/mail/ | du -h /var/spool/mail/* | sort -nr | grep "M"
Now, how can make this data and approach be of useful to our daily tasks. Let us assume we want to get email alerts of these top 5 or top 10 largest file user to our mail box, or how about getting the largest mail spool user on daily basis into our mail box?
Get Email Alerts from Script Outputs
Here's how to get email alerts of top flat mail box users (without database) or top file users?
Simply get the top 5 or top 10 largest file from your system or largest flat mail box user, simply issue the linux head command
Get Top N Largest User
For top 5 largest file or largest mail box user
# cd /var/mail
# ls -l | sort -k5 -nr | head -5
# ls -lS | head -5
Result:
~~~~~~~~~~~~~~~~~~~~~~~~~~~~~~~~~~~~~~~~~~~~~~~~~~~~~~~~~~~~~~~~~~~~~~~~~~~
-rw------- 1 rtalasa mail 899999958 Jan 18 11:41 rtalasa
-rw------- 1 ayesuf mail 899999937 Jan 18 11:41 ayesuf
-rw------- 1 aaluko mail 899999916 Jan 18 11:41 aaluko
-rw------- 1 amarquez mail 899999713 Jan 18 11:41 amarquez
-rw------- 1 aogiri mail 899999617 Jan 18 11:41 steve
~~~~~~~~~~~~~~~~~~~~~~~~~~~~~~~~~~~~~~~~~~~~~~~~~~~~~~~~~~~~~~~~~~~~~~~~~~~
# ls -ls /var/spool/mail/ | du -h /var/spool/mail/* | sort -nr | grep "M" | head -5
Result:
~~~~~~~~~~~~~~~~~~~~~~~~~~~~~~~~~~~~~~~~~~~~~~~~~~~~~~~~~~~~~~~~~~~~~~~~~~~
860M /var/spool/mail/yabdulrahman
860M /var/spool/mail/vogobiri
860M /var/spool/mail/rtolosa
860M /var/spool/mail/rlinog
860M /var/spool/mail/raouad
~~~~~~~~~~~~~~~~~~~~~~~~~~~~~~~~~~~~~~~~~~~~~~~~~~~~~~~~~~~~~~~~~~~~~~~~~~~
Of course, the top 10 is similarly like so
# cd /var/mail
# ls -l | sort -k5 -nr | head -10
# ls -lS | head -10
# ls -ls /var/spool/mail/ | du -h /var/spool/mail/* | sort -nr | grep "M" | head -10
Now, a more simplified form of retrieving the largest user from /var/spool/mail, parsing and retrieving only the username and the filesize fields could be done like so
# ls -l | sort -k5 -nr | head -5 | awk '{print $3,$5}'
If you wish to alert yourself and send these results to your email box , simply save the result as file and send the file to your email similarly like so
# ls -l | sort -k5 -nr | head -5 | awk '{print $3,$5}' > top5
# cat top5 | mail -s "My Top Large Files or Users" myown@domain.com
Job Scheduling
Remember the cron scheduling job to do it on regular basis.
Enjoy.
Related Readings:
Cronjob Scheduling Explained
GNOME Task Cron Scheduler
KDE GUI Task Scheduler
HowTo: Squeezed Out Multiple Lines From Text File
If you have a text file with multiple lines running between each set of words or pharagraph, here's how to convert those multiple line breaks into single line breaks and totally remove paragraph lines, new lines or return lines inside text files.
Supposed you have a cluttered text file or configuration file with multiple line breaks or lines between set of words or paragraphs, you can easily remove them by using linux grep or tr command.
How to remove multiple empty lines, line breaks, new lines from a text file?
# cat testfile.txt
---------------------------------------------------------
1 1
ilovetux.com
2 2
3 3
4 4
---------------------------------------------------------
Blogspot may purged and blurred out the character space format from the above lines and remove new empty lines between the words, so here's a capture of the text file, see image shown below
To remove multiple lines or line breaks between each lines from text file using grep, simply
# cat testfile.txt | grep " "
# grep " " testfile.txt
Result:
~~~~~~~~~~~~~~~~~~~~~~~~~~~~~~~~~~~~~~~~~~~~~~~~~~~~~~
1 1
ilovetux.com
2 2
3 3
4 4
~~~~~~~~~~~~~~~~~~~~~~~~~~~~~~~~~~~~~~~~~~~~~~~~~~~~~~
Now to suppress multiple lines or line breaks between each lines from text file using tr, simply
# cat testfile.txt | tr -s "\n"
would give you the same result that grep command had produced
Result:
~~~~~~~~~~~~~~~~~~~~~~~~~~~~~~~~~~~~~~~~~~~~~~~~~~~~~~
1 1
ilovetux.com
2 2
3 3
4 4
~~~~~~~~~~~~~~~~~~~~~~~~~~~~~~~~~~~~~~~~~~~~~~~~~~~~~~

Enjoy.
Related Readings:
How To Delete and Remove New Lines from Text File
Strip and Remove Directory Name from Directory Path Name
Parse and Retrieve FileName Extension Only
Thursday, January 17, 2008
HowTo: Prevent Binary Execution From Mounted Device
Most probable reasons of leaving a post-compiled trojan programs after successfully exploiting a system is brought about by small percentage of having increased security by root not to enable user from compiling a program source, or run executable scripts and binary programs from particular device.
How to mount your device to further prevent script execution from it or program compilation from that mounted device?
Here's a quick tip on preventing any users from doing binary and shell scripts execution from particular mounted device such as /tmp or /dev/shm directory folder.
How to mount device with noexec preventing program execution?
Simply remount your device as non-suidable and non-executable system device
# mount -o remount, noexec, nosuid /tmp
Yes, remounting them individually can also be done
# mount -o remount, noexec /tmp
# mount -o remount, noexec /tmp
Now, to do some testing, copy an existing executable script and placed in under /tmp folder like so
# cp /root/scripts/test.pl /tmp
# cp /root/scripts/test.sh /tmp
and try to execute those copied scripts like so
# cd /tmp
# ./test.pl
bash: ./test.pl: Permission denied
# ./test.sh
bash: ./test.sh: Permission denied
You can also copy a linux binary file into /tmp and try to execute them.
# cp /usr/bin/who /tmp
# /tmp/who
bash: /tmp/who: Permission denied
Program execution should fail since the device is mounted with noexec and nosuid. However, some linux OS requires the said mounted /tmp device to be listed from /etc/fstab with valid file system type before it can be remounted back again.
To remount all your device back to its default boot up settings based on /etc/fstab, simply
# mount -a
To make the device noexec and nosuid remounts permanently between reboots, simply add it to your existing /tmp mounting flags from /etc/fstab similarly like so.
/dev/sda5 /tmp ext3 noexec,nosuid 0 0
Be noted that remounting a device with noexec and nosuid flag would not totally prevent someone from exploiting or abusing your system.
Enjoy.
Related Readings
Remount Partition and Device as Read-Only
How to Add Additional Swap File
How to Format Windows Partition Inside Linux
How to mount USB Flash Devices
HowTo: Determine Domain's Expiration Date From Linux Terminal
Determining domain expiration is also part of an IT web-enabled infrastructure. There are a lot of window softwares that queries the internet for the domain's expiration date.
Here's an easy way on how to display your domain's expiration date using linux terminal command in a single shot.
Check Domain Expiration Date
# whois yourdomain.com
The result is too long, I agree with you. Knowing the expiration date is the only line we need at this point.
So, here's a generic shortcut of retrieving your domain's expiration date from linux command line terminal.
# whois yourdomain.com| grep -i "expir\|renewal date:"
The above command gives the domain's expiration date when executed, well mostly.
Additionally, expanding this command inside a shell script and sending you an email alert N days before domain expiration is also possible. However, you need to adapt or adjust your shell script from the different format results produced by various domain registrar around the web.
Enjoy.
HowTo: Create and Overwrite Existing Alias
An existing linux command exists from linux binary folder, and this command when executed display a result which is not complete for your regular daily task. Simply to say, you need to add or delete its default command parameter when executed. Worry not, here's an entry to create and/or overwrite an existing linux command aliases.
Create Linux Command Alias
Assuming that you have a current assignment for the day, and you noticed that during the accomplishment of this task, you keep on executing and listing out all files under /var/www/html/zoneA/project/2007/public_html/web1 directory folder. Creating shortcut commands of those repetitive commands can be done using linux command aliases.
Basic example of creating linux command alias.
~~~~~~~~~~~~~~~~~~~~~~~~~~~~~~~~
# ls -la /var/www/html/zoneA/project/2007/public_html/web1
# alias wow='ls -la /var/www/html/zoneA/project/2007/public_html/web1'
# wow
~~~~~~~~~~~~~~~~~~~~~~~~~~~~~~~~
Issuing the two linux commands below will display the same results
~~~~~~~~~~~~~~~~~~~~~~~~~~~~~~~~~~~~~~~~~~~~~~
# wow
# ls -la /var/www/html/zoneA/project/2007/public_html/web1
~~~~~~~~~~~~~~~~~~~~~~~~~~~~~~~~~~~~~~~~~~~~~~
Now, here's how to verify and list out current linux command aliases
# alias
Result:
~~~~~~~~~~~~~~~~~~~~~~~~~~~~~~~~~~~~~~~~~~~~~~~~~~~~~~~~~~~~~~~~
alias cp='cp -i'
alias l.='ls -d .* --color=tty'
alias ll='ls -ll --color=tty'
alias wow='ls -la /var/www/html/zoneA/project/2007/public_html/web1'
~~~~~~~~~~~~~~~~~~~~~~~~~~~~~~~~~~~~~~~~~~~~~~~~~~~~~~~~~~~~~~~~
To modify an existing linux command alias, simply issue as root
~~~~~~~~~~~~~~~~~~~~~~~~~~~~~~~~
# alias cp='cp -i -arpv'
~~~~~~~~~~~~~~~~~~~~~~~~~~~~~~~~
Verify that the particular linux alias has been modified by listing out all aliases
# alias
Result:
~~~~~~~~~~~~~~~~~~~~~~~~~~~~~~~~
alias cp='cp -i -arpv'
alias l.='ls -d .* --color=tty'
alias ll='ls -ll --color=tty'
alias wow='ls -la /var/www/html/zoneA/project/2007/public_html/web1'
~~~~~~~~~~~~~~~~~~~~~~~~~~~~~~~~
Be careful with linux aliases though it could also confuse system users like so
# alias ls='echo command not found'
# ls
Result:
~~~~~~~~~~~~~~~~~~
command not found
~~~~~~~~~~~~~~~~~~
Linux aliasing command can also be used to execute external scripts. That means, linux aliases can also be used to restrict and/or prevent user from executing particular scripts or commands from the system.
How to use linux aliasing to call and execute an external shell script?
# alias wow='$USER/myown.sh'
# wow
The above creates a wow alias that calls for myown.sh script under the user's home folder. myown.sh could contain some useful script, reminder, note or another linux command, sure you get the idea here.
Enjoy.
Related Readings:
Linux Command Line Shell Variables
Linux Command Aliases Explained
Find Command Translated to Perl Codes
HowTo: Get MAC Address of PCs Around
IP address inventory and management could be part of your regular task. This may include MAC address inventory for network cards and host identification.
Here's a quick blog entry on retrieving MAC Address the network card of each host inside your local broadcast network.
To retrieve and fetch the MAC Address of a particular host's IP address
# arping host.ip.address.here
# arping x.x.x.x
Just make sure that the target host is part of your local subnet or local broadcast network to avoid getting the MAC address from the middle router that is in action of the route stuff. This arping command can also be used to retrieve MAC address from multiple host to fetch multiple host from your local network via shell script.
Here's a generic and basic shell script to arping multiple hosts. The below shell code would arping hosts that has IP address between 192.168.0.2 and 192.168.0.254 .
# cat multiple.sh
~~~~~~~~~~~~~~~~~~~~~~~~~~~~~~
#/bin/bash
for ((i=2; i<=254;i=i+1 ));
do
arping -c 1 192.168.0.$i
done
~~~~~~~~~~~~~~~~~~~~~~~~~~~~~~
Then, simply call the script to filter only the MAC address like so
# ./multiple.sh | grep "reply from"
Result:
~~~~~~~~~~~~~~~~~~~~~~~~~~~~~~~~~~~~~~~~~~~~~~~~~~~~~~~~~~
Unicast reply from 83.x.x.x [00:02:A5:EC:00:8B] 0.705ms
~~~~~~~~~~~~~~~~~~~~~~~~~~~~~~~~~~~~~~~~~~~~~~~~~~~~~~~~~~
IP address and the MAC address filter can also be applied similarly like so
# ./multiple.sh | grep "reply from" | awk '{print $4,$5}'
Alternatively, you can use linux nmap command to retrieve MAC address of a particular host with known IP address as shown below
# nmap x.x.x.x
# nmap enter.ip.address.here
Nmap also supports multiple IP address and subnet blocks as input parameters. This basically means that nmap linux tool can list out MAC address of multiple hosts by feeding nmap with multiple host or network block inputs like so
# nmap 192.168.0.0/24
And a lot more. Enjoy.
Related Readings:
Other Interesting Pings
More of NMap Port Scanning
MAC Address Packet Filtering Using Iptables
Ping IP Address Subnet and Multiple Hosts Ping
Linux Ping Command Explained
Install Fping Linux Tool
HowTo: List Out Hidden Files and Hidden Directory Folder
Quick tip.
It is strange to know that the default ls alias command from other linux distro does not show hidden directories by default.
Here's an entry on how to find hidden files of a particular directory.
Simply issue
# ls -a
# ls -la
The -a tells ls to include hidden directory folders
Listed hidden directory folders start with a period (.) before its name which identifies that the folder is currently of hidden directory type.
To show hidden files inside hidden directory folder, simply
# cd .hiddenfolder
# ls -la
Try listing out hidden directory from your root folder location, you'll see a lot of them specially when you are using X.
# cd /root
# ls -la
Enjoy.
Related Reading:
List Out Files in A Tree View Directory Structure
HowTo: Identify Valid Login Shells
Here's a quick tip on listing out and identifying all the shells available from a Fedora box.
This file is also responsible for keep a record of all available and valid login shells root can delegate to a particular system account. This file is also being consulted by other programs to determine the type of user account trying to login into the system.
To list out all valid login shells, simply
# cat /etc/shells
~~~~~~~~~~~~~~~~~~~~~~~~~~~~~~~~~~
/bin/sh
/bin/bash
/sbin/nologin
/bin/zsh
/bin/ftpsh
/usr/local/cpanel/bin/jailshell
/usr/local/cpanel/bin/noshell
/dev/null
/bin/ksh
/bin/tcsh
/bin/csh
~~~~~~~~~~~~~~~~~~~~~~~~~~~~~~~~~~
The above results should be similar from any other linux /etc/shells file.
A few daemon services of application that consults this file are FTP, SSH, TFTP and more.
Additionally, a super user root cannot create user and designate it with non-existing login shell type from /etc/shells file.
HowTo: Deny User from Logging Into Your System
There are times when you need to prevent a particular bash-enabled user to login temporarily into your system, without completely deleting his account, here's an entry to do that.
This entry can be helpful for a situation wherein you need to temporarily prevent bash-enabled users from logging into the system.
How to temporarily deny a user from logging into a system?
# finger visitor
~~~~~~~~~~~~~~~~~~~~~~~~~~~~~~~~~~~~~~~~~~~~~~~~~~~~~~~~~
Login: visitor Name: (null)
Directory: /home/visitor Shell: /bin/bash
~~~~~~~~~~~~~~~~~~~~~~~~~~~~~~~~~~~~~~~~~~~~~~~~~~~~~~~~~
To restrict the above visitor account from logging into the system while you are fixing something related to his website folder or files, simply
# chsh visitor -s /sbin/nologin
As soon as the visitor account logs in, a similar message pops out
~~~~~~~~~~~~~~~~~~~~~~~~~~~~~~~~~~~~~~~~
This account is currently not available.
~~~~~~~~~~~~~~~~~~~~~~~~~~~~~~~~~~~~~~~~
Alternatively, you can lock the account while you are busy at fixing something related to his websites files and folders
# passwd -l visitor
The above prevents visitor account from logging into the system by locking his system account. The only difference is that first approach sends a friendly temporary unavailability message to that particular system user of
~~~~~~~~~~~~~~~~~~~~~~~~~~~~~~~~~~~~~~~~
This account is currently not available.
~~~~~~~~~~~~~~~~~~~~~~~~~~~~~~~~~~~~~~~~
while the second approach of freezing or locking the user account would send a horrible system message similar to
~~~~~~~~~~~~~~~~~~~~~~~~~~~~~~~~~~~~~~~~
Permission denied, please try again.
~~~~~~~~~~~~~~~~~~~~~~~~~~~~~~~~~~~~~~~~
There are a lot of ways to prevent a particular user from logging into the system.
Enjoy.
Related Reading:
Disable Any User from Logging into the System
Linux Password, Shadow and Group Files Explained
HowTo: Remove Tabs From Text Files Completely
Here's how to remove tabs or tab characters completely from a file.
# cat testfile.txt
~~~~~~~~~~~~~~~~~~~~~~~~~~~~~~~~~~~~~
a a a a
b b b b
c c c c
123 123 123
~~~~~~~~~~~~~~~~~~~~~~~~~~~~~~~~~~~~~
Let us be verbosed and show tab characters when viewing text files
# cat -t -v testfile.txt
~~~~~~~~~~~~~~~~~~~~~~
a^Ia^Ia^Ia
b^Ib^Ib^Ib
c^Ic^Ic^Ic
123^I^I123^I^I123
~~~~~~~~~~~~~~~~~~~~~~
From the above result, the tab chacters are represented by (^I) characters. To remove these tab characters, simply
# cat testfile.txt | tr -d "\t\v"
~~~~~~~~~~~
aaaa
bbbb
cccc
123123123
~~~~~~~~~~~
Saved it permanently
# cat testfile.txt | tr -d "\t\v" > testfile-NO-TABS.txt
Related Reading:
Replacing Tab with Space Character
Remove Space from Filenames
Remove Blank or Empty Lines from File Using sed or grep
HowTo: Convert Tabs In Each File To Spaces
Converting tab characters to space characters can be done quite easily in linux. This task can be handy on removing tab characters in a file and convert them to specified space characters at the same time.
If you have just exported an article or data into a file with tab-columnized or tab-separated file format, and you wish to replace tab character with space characters, this blog entry is just right for that task.
Here's an entry on how to remove tabs characters in a file and convert them to specified number of space characters ?
# cat testfile.txt
~~~~~~~~~~~~~~~~~~~~~~~~~~~~~~~~~~~~~~
a a a a
b b b b
c c c c
123 123 123
~~~~~~~~~~~~~~~~~~~~~~~~~~~~~~~~~~~~~~
# cat -t testfile.txt
~~~~~~~~~~~~~~~~~~~~~
a^Ia^Ia^Ia
b^Ib^Ib^Ib
c^Ic^Ic^Ic
123^I^I123^I^I123
~~~~~~~~~~~~~~~~~~~~~
Now, to convert those tab characters into single space character, simply
# expand -1 testfile.txt
Result:
~~~~~~~~~~~~~~~
a a a a
b b b b
c c c c
123 123 123
~~~~~~~~~~~~~~~
To convert tab character to 4 space characters
# expand -4 testfile.txt
Result:
~~~~~~~~~~~~~~~~~~~~~~~
a a a a
b b b b
c c c c
123 123 123
~~~~~~~~~~~~~~~~~~~~~~~
Enjoy.
Related Readings:
String Manipulation Using tr
String Manipulation Using cut
Deleting New and Line Character from a File
Tuesday, January 15, 2008
HowTo: Install and Say Cheese
What is Cheese?
Cheese is a GNOME application designed to take photos and videos of you and your friends with your webcam, add special effects to them and share them with your friends and family. Cheese linux application was written as part of Google's 2007 Summer of Code lead by Daniel G. Siegel and mentored by Raphaël Slinckx, and has most of the classical photo booth features after a bare couple of months of development.
Cheese is a Photobooth-inspired GNOME application for taking pictures and videos from a webcam. Cheese also includes fancy graphical effects based on the gstreamer-backend.Under the hood, Cheese uses GStreamer to apply fancy effects to photos and videos.
In other words, cheese takes picture and movie shots and captures from your webcam as a source. Cheese saves these photos with different effects that can be previewed instantly right from your desktop.
Another good thing about cheese is that it will be included with Gnome 2.2. The last stable package release of Cheese software was freshly done yesterday.
Cheese Installation
Cheese is available from Fedora Amusement and Graphics Repo. Thus, cheese can be installed using yum as shown below, which downloads around 700K of rpm package size.
# yum -y install cheese
Binary Launch
Before launching cheese, make sure that your webcam is currently turned on and connected for cheese to snap webcam pictures properly.
# cheese
Cheese Webshot:


Enjoy and say cheese!
Cheese FAQs and Wiki.
HowTo: Install HomeBank and Manage Personal & Financial Accounts
If you are looking for an easy way to manage your personal accounts, finances, manual finances analysis, dirty does it financial graphs...then read on.
Introducing HomeBank
HomeBank is the free software you have always

wanted to manage your personal accounts at home. The main concept is to be light, simple and very easy to use. HomeBank brings you many features that allows you to analyze your finances in a detailed way instantly and dynamically with powerful report tools based on filtering and graphical charts.
Let me tell you why HomeBank is different and feature-rich personal accounts management and analysis tool.
HomeBank Features
* transaction import in CSV format (homebank specific format)
* pre-defined transactions, which can be automated
* pre-filling of transactions from a bookmark
* dual pad of cheque and automated cheque number increment
* add transactions by inherit from existing ones
* multiple transactions edit for each columns at once
* easy transfert between accounts, which can be automated
* dynamic transactions filter everywhere
* visual paymode and additional info text field
* visual status of transactions
* transaction remind (kind of 'post-it')
* dynamic minor currency display toggle for Euro countries
HomeBank Analysis features
Dynamic, easy and powerful reports with graphical charts:
* complete filter for every transaction fields
* easy period change with some useful presets
* 'Statictics' is the main report and show results computed by: Payee, Categories, Months, Years
* 'Budget' track the decay from what was normaly planned
* 'Overdrawn' focuses on the balance and point transactions in the 'red zone'
* 'Car cost' analyze your car specific costs and consumption of fuel
And more to see.
Homebank supports includes mailing list, online help, bug tracking, feature request and more. The only installation requirement for HomeBank is an internet connection and GTK+-2.10 package or its upper version. HomeBank is released under the GPL license.
HomeBank Installation
HomeBank is available from Fedora Extra repo and can be installed using yum. Homebank is also available from many different distro like Ubuntu, Debian, Fedora, OpenSuse, Windows, MacOS, and more. Check out their dowload link from here. http://homebank.free.fr/index.php?id=20
# yum -y install homebank
Take some time to try HomeBank, you won't regret it.
HomeBank Webshots:


Further Readings: HomeBank
HowTo: Install Mind-Mapping LabyRinth Tool
Do you need a mind-mapping tool for linux? How about an abstract representation and map of ideas, analogies, symbols, plans and funny snappy things that comes in our mind from time to time to be drawn from a linux tool?
Introducing Labyringth
Labyrinth is a lightweight mind-mapping tool, written in Python using Gtk and Cairo to do the drawing. Labyrinth is intended to be as light, easy to operate, user-friendly and intuitive as much as possible, but still designed to provide a wide range of powerful mind-mapping features.
A mind-map is a diagram used to represent words, ideas, tasks or other items linked to and arranged radially around a central key word or idea. It is used to generate, visualize, structure and classify ideas, and as an aid in study, organization, problem solving, and decision making.
Highlighted Labyringth Features
# Open maps from the command line (allowing Beagle to work with labyrinth properly) - Kevin Kubasik (Issue #3)
# Add "Further Info" to all thoughts allowing further notes to be attached to any thought. Some work borrowed from Gourmet Recipe Manager (http://grecipe-manager.sourceforge.net/)
# Store maximised state for maps across saves
# Export as Image (png and jpeg)
# Selecting text within thought now works
# Cut / copy / paste using clipboard and primary selection
# Much improved handling of multibyte characters and non-English keyboard layouts
# Massively cool new tango-ified icon (Josef Vybíral)
# Large Browser internal rework. Added optional trayicon (disabled by default) Can be enabled by passing --use-tray-icon to labyrinth - First step towards an applet (Andreas Sliwka)
and more.
Labyrinth Installation
Labyrinth is available from other linux distribution like Debian/Ubuntu, Windows, CentOS/Redhat and related OS. Check the download link here. Fedora 8 supports Labyrinth installation via yum, which downloads around 146K of package size.
# yum -y install labyrinth
Upon yum installation, Labyrinth is available from Applications and Productivity Fedora menu.
Binary Execution
# labyrinth
LabyRinth Webshots


Have fun!
HowTo: Install VMWare Server on Fedora 8
Desktop virtualization has been continuously capturing users and web services. More and more companies are creating virtual machines and appliances that can be of productive service to many web users around the globe.
From recent post, here's a quick howto install VMWare Server on Fedora 8.
VMWare Server Pre-Requirements
VMWare Server package needs to compile its own needed VMWare kernel modules in order to be installed successfully. Make sure you have the necessary kernel packages and gcc compiler. Here are my own version details prior to my own VMWare Server installation.
kernel-2.6.23.1-42.fc8
kernel-headers-2.6.23.9-85.fc8
kernel-devel-2.6.23.1-42.fc8
gcc-4.1.2-33
gcc-c++-4.1.2-33
Usually, these packages can be queried using the standard rpm query format like so
# rpm -qa kernel* gcc*Kernel versions differ from each Fedora boxes. The pros and cons of upgrading your current F8 kernel would not be covered here.
VMWare Server Installation on Fedora 8
Simplified four steps of installing VMWare Server on Fedora 8 OS.
1. Download VMWare Server rpm package installer for linux from here. While downloading, take a few minutes to do other stuff and comeback after a while since the download size of VMWare Server version 1.0.4 is around 105 MB in size, it would take a while. Alternatively, you can prepare your registration details from the next installation step.
2. Do register from and retrieve VMWare Server serial number from here.
3. Launch rpm to install VMWare Server package like so
# rpm -ivh VMware-server-1.0.4-56528.i386.rpmAt this point, it is adviseable not to execute vmware-config.pl perl script yet as the VMWare files package needs to be patched first.
4. Download and apply the vmware patch version 115 from here. This can be done as shown
# tar zxvf vmware-any-any-update115.tar.gz
# cd vmware-any-any-update115
# ./runme.pl
Here are the usual questions that might be presented using the patch perl script. Most of them are answerable by simply hitting the ENTER key as shown below:
The file /usr/lib/vmware/modules/source/vmmon.tar that this script was about to
install already exists. Overwrite? [yes]
The file /usr/lib/vmware/modules/source/vmnet.tar that this script was about to
install already exists. Overwrite? [yes]
In which directory do you want to install the mime type icons?
[/usr/share/icons]
What directory contains your desktop menu entry files? These files have a
.desktop file extension. [/usr/share/applications]
In which directory do you want to install the application's icon?
[/usr/share/pixmaps]
None of the pre-built vmmon modules for VMware Server is suitable for your
running kernel. Do you want this program to try to build the vmmon module for
your system (you need to have a C compiler installed on your system)? [yes]
What is the location of the directory of C header files that match your running
kernel? [/lib/modules/2.6.23.1-42.fc8/build/include]
..
..
The below replies fits my need.
Do you want networking for your virtual machines? (yes/no/help) [yes]
Do you wish to configure another bridged network? (yes/no) [no]
Do you want to be able to use NAT networking in your virtual machines? (yes/no)
[yes]
Do you want this program to probe for an unused private subnet? (yes/no/help)
[yes] no
You can change the below to your needs should you decide to have bridging network and NAT enabled virtual hosts.
What will be the IP address of your host on the private
network? 192.168.200.2
Do you want to be able to use host-only networking in your virtual machines?
[yes]
Configuring a host-only network for vmnet1.
Do you want this program to probe for an unused private subnet? (yes/no/help)
[yes] no
Do you wish to configure another host-only network? (yes/no) [no]
The default port : 902 is not free. We have selected a suitable alternative
port for VMware Server use. You may override this value now.
Remember to use this port when connecting to this server.
Please specify a port for remote console connections to use [904] Enter
Do you want this program to set up permissions for your registered virtual
machines? This will be done by setting new permissions on all files found in
the "/etc/vmware/vm-list" file. [no] yes
Generating SSL Server Certificate
In which directory do you want to keep your virtual machine files?
[/var/lib/vmware/Virtual Machines] /root/.VirtualBox/
Do you want to enter a serial number now? (yes/no/help) [no]
You should be seeing the below lines once you a successful VMWare Server installation
The configuration of VMware Server 1.0.4 build-56528 for Linux for this running kernel completed successfully.
Congrats, you now have a successful install of working VMWare Server.
Enjoy VMWare server from your Fedora 8 box.
Binary Launch
# vmwareRelated Blog Posts:
VMWare Workstation on Fedora 8
Single Step VirtualBox Installation
Virtual PCLinuxOS

Make Money


Live Traffic
