Here's another quick howto on stripping or removing directory folder path and/or filename suffix or filename extensions of a given complete or partial filename using the linux basename command.
Basename strips directory and suffix from filenames by definition. Basename binary is part of coreutils package. This basename command can be useful on handling filename strings or directory path on multiple counts. Instead of issuing a command or combinations of of shell string functions, awk, cut, tr, or sed command and other linux command, stripping leading directory path locations and filename suffixes can easily be done using basename command.
From the complete path location of /var/named/chroot/etc/named.conf , /var/named/chroot/etc/ and .conf can be removed by this basename command.
Basename command is designed to strip and remove those leading directory folder/path and filename extensions.
Here are ways on how to remove or strip leading folder path (directory name) and filename extensions (suffix filenames).
Example 1:
~~~~~~~~~~~~~~~~~~~~~~~~~~~~~~~~~~~~~~~~~~~~~~~~~~
# cd /etc
# basename named.conf .conf
output:
named
~~~~~~~~~~~~~~~~~~~~~~~~~~~~~~~~~~~~~~~~~~~~~~~~~~
Example 2:
~~~~~~~~~~~~~~~~~~~~~~~~~~~~~~~~~~~~~~~~~~~~~~~~~~
# basename /var/log/messages
output:
messages
~~~~~~~~~~~~~~~~~~~~~~~~~~~~~~~~~~~~~~~~~~~~~~~~~~
Example 3:
~~~~~~~~~~~~~~~~~~~~~~~~~~~~~~~~~~~~~~~~~~~~~~~~~~
# basename /etc/named.conf
output:
named.conf
~~~~~~~~~~~~~~~~~~~~~~~~~~~~~~~~~~~~~~~~~~~~~~~~~~
Example 4:
~~~~~~~~~~~~~~~~~~~~~~~~~~~~~~~~~~~~~~~~~~~~~~~~~~
# basename /etc/named.conf .conf
output:
named
~~~~~~~~~~~~~~~~~~~~~~~~~~~~~~~~~~~~~~~~~~~~~~~~~~
Example 5:
~~~~~~~~~~~~~~~~~~~~~~~~~~~~~~~~~~~~~~~~~~~~~~~~~~
# basename /etc/named.conf conf
output:
named.
~~~~~~~~~~~~~~~~~~~~~~~~~~~~~~~~~~~~~~~~~~~~~~~~~~
Get the pattern, alright.
Try it, basename can be extremely useful on long lines of shell scripts manipulating filenames.
Get Fedora

Friday, November 30, 2007
HowTo: Strip directory path and filename suffix
HowTo: Get the Filename Extension Only
From previous post, we have managed to strip the leading folder path and filename extension. Now, this blog entry is here to cover the reverse approach of my previous basename blog post.
How to manipulate a filename string and return only the filename extension of a file from command line using awk parameters.
For filename with single file extension, removing the leading file name and leaving only the file extension name would be done like so:
~~~~~~~~~~~~~~~~~~~~~~~~~~~~~~~~~~~~~~~~~~~~~~~~
# printf named.conf | awk -F . '{print $2}'
output:
conf
~~~~~~~~~~~~~~~~~~~~~~~~~~~~~~~~~~~~~~~~~~~~~~~~
For filename with multiple file extension, stripping the leading filename and leaving only the file extension:
~~~~~~~~~~~~~~~~~~~~~~~~~~~~~~~~~~~~~~~~~~~~~~~~
# printf named.conf.bak | awk -F . '{print $NF}'
output:
bak
~~~~~~~~~~~~~~~~~~~~~~~~~~~~~~~~~~~~~~~~~~~~~~~~
Another example of removing the leading directory path and leaving only the suffix filename:
~~~~~~~~~~~~~~~~~~~~~~~~~~~~~~~~~~~~~~~~~~~~~~~~~~~~~~~~~~~~~~~~~~~~~~~~~~~~~~~
# printf /var/cache/named/etc/backup/named.conf.bak | awk -F . '{print $NF}'
output:
bak
~~~~~~~~~~~~~~~~~~~~~~~~~~~~~~~~~~~~~~~~~~~~~~~~~~~~~~~~~~~~~~~~~~~~~~~~~~~~~~~
or using basename would yield to same resulting string
~~~~~~~~~~~~~~~~~~~~~~~~~~~~~~~~~~~~~~~~~~~~~~~~~~~~~~~~~~~~~~~~~~~~~~~~~~~~~~~
# basename /var/cache/named/etc/backup/named.conf.bak | awk -F . '{print $NF}'
output:
bak
~~~~~~~~~~~~~~~~~~~~~~~~~~~~~~~~~~~~~~~~~~~~~~~~~~~~~~~~~~~~~~~~~~~~~~~~~~~~~~~
HTH
Tailf - watch the linux log file grows
Another overused linux command that has been quite around from this linux blog entry and widely used command on monitoring log file tail. Tail binary allows a user to watche the growth of a log file. Watching the log file grows can be done using an additional -f parameter. Alternatively, another approach to watch a log file grows can be done using tailf binary command.
To tailf or to tail -f ? That is the question.
Tailf binary is part of util-linux-ng linux package while tail binary is part of coreutils linux package.
File size difference of tailf and tail binary command:# ls -la /usr/bin/tailf /usr/bin/tail
-rwxr-xr-x 1 root root 7416 2007-10-16 21:48 /usr/bin/tailf
-rwxr-xr-x 1 root root 43576 2007-10-30 17:52 /usr/bin/tail
Man Tailf
Tailf will print out the last 10 lines of a file and then wait for the file to grow. It is similar to tail -f but does not access the file when it is not growing. This has the side effect of not updating the access time for the file, so a filesystem flush does not occur periodically when no log activity is happening. Tailf requires only a single parameter when watching a growing log file. Tailf follows the following command format# tailf logfile
Tailf is extremely useful for monitoring log files on a laptop when logging is infrequent and the user desires that the hard disk spin down to conserve battery life.
Tailf Usage Examples# tailf /var/log/messages
# tailf /var/log/maillog
HTH
Fedora 8 with Enlightenment Window Manager
Linux Window Manager definition:
Wiki defines Window Manager as:
n X window manager is window manager under the X Window System, a windowing system mainly used on Unix-like systems.
Here's the shortest definition of Window Manager I could find, with the help of Google.
Linux window manager is a graphical interface which is commonly know as X11 or more simply as 'X'.
Unlike the Apple Macintosh and Microsoft Windows platforms, which have historically provided a vendor-controlled, fixed set of ways to control how windows and panes display on a screen, and how the user may interact with them, window management for the X Window System was deliberately kept separate from the software providing the graphical display.
This linux blog entry chooses one of those popular and widely used linux window manager, Enlightenment.
Enlightenment is a window manager. Enlightenment is a desktop shell. Enlightenment is the building blocks to create beautiful applications. Enlightenment, or simply e, is a group of people trying to make a new generation of software.
The latest version of Enlightenment is DR17. DR17 of the Enlightenment window manager represents an evolution into the next generation of desktop environments: the desktop shell. DR17 will provide integration between files and your environment in a seamless manner while encompassing a graphically rich and flexible architecture. It will not compete with GNOME or KDE, but be a completely new way of visualizing your desktop, based around the EFL which was built from the ground up for this task.
Still in heavy development, several applications that will be part of the DR17 release and examples of what is possible are already available in CVS, such as Entice, Entrance, and Evidence.
Enlightenment Installation
Here are 3 steps on how to install Enlightenment (E16 version) on Fedora 8.
1. Grab the rpm package for Fedora 6. Click here.
Alternatively, install enlightenment directly using rpm package manager like so
# rpm -ivh http://garr.dl.sourceforge.net/sourceforge/enlightenment/e16-0.16.8.10-1.fc6.i386.rpm
2. Logout from Linux X and login back again using Enlightenment instead of GNOME/KDE window manager or hit Ctrl+Alt+Backspace to restart Linux X window manager.
3. Customize your window layouts, progam menus and desktop behavior using left and right clicks of your mouse from the Enlightenment window manager desktop.
Take note that you can still use GNOME X manager while Enlightenment window manager is enabled by choosing E-GNOME during the login setup.
You can switch back to your original X window manager by logging out and logging back in into your original window manager.
Here are serveral Enlightenment desktop screenshots.
Check out Enlightenment website, click here.
See more of shared enlightenment screenshots from here and here.
Enjoy and happy weekend!
Thursday, November 29, 2007
HowTo: ScreenCasts & Desktop Records via Istanbul
Istanbul is a desktop session recorder for the Free Desktop. Istanbul records your desktop session into an Ogg Theora video file. The video file can then be used for your presentation, demos, tutorials and video works. Istanbul desktop session recorder offers a lot greate screen recording features. Istanbul can record audio sounds, running videos, 3D desktop screens, mouse movements, specific screen area, screen size and desktop application windows.
Istanbul Operations
Istanbul relies on new x display screen capturing support in gstreamer-plugins package. The ximagesrc gstreamer element is under active development upstream yet.
When launched, Istanbul sits down on top of your notification area as a small red button. Then istanbul waits for mouse clicks for further operations. To start desktop session recording, simply click on Istanbul red icon from the notification area and to stop you click its icon again. Use your mouse right click to view and change istanbul's desktop recording options and features. The resulting video file is in OGG video file format which makes it easy for playback. Istanbul works on GNOME, KDE, XFCE and others.
For a clear and smooth desktop session recording and screencasting, it is highly recommended that your screen resolution is set lower or equal to 800x640 screen reso. Istanbul works roughly with my 1024x768 screen reso. The frame rate should also be adjusted to 1.0 frame rate per second to immediately capture every possible screen movements and desktop operations. I am still trying to achieve this, python suggestion?
When recording, the small red button turns into a square gray box still sitting down from the notification area. Click the square gray box from the notification area to stop the desktop recording. From there, Istanbul would then ask you for the filename before saving the video file. Once the saving is done, you can now start viewing the OGG video file.
Istanbul Installation
Istanbul can be installed to Fedora 8 via yum
~~~~~~~~~~~~~~~~~~~~~~~~~~~~~~~
# yum -y install istanbul
~~~~~~~~~~~~~~~~~~~~~~~~~~~~~~~
Binary Launch:
Alt+F2, istanbul
Sample Recording
The below istanbul screencasting were recorded from my 17" monitor with 1024x768 screen reso. As you can see, the video is turtle-walk and roughly delayed with most screen and mouse movements. I may need to adjust my frame rates. I have tried a lower screen reso but bad screencasting I achieved. Istanbul had done a great start on linux screencasting but there's always a lot of improvement left. I would keep an eye on this.
Here's a recorded session using a terminal window:
And with desktop effects enabled, below is a sample not-so-good screencasting I have done so far:
For further related reading, you may visit Istanbul and Fedora-Wiki.
The above screencasts has been done on Fedora 8. If you like this post, I would be glad if you can share it support of sharing it or hitting some diggs and stumbles.
Would appreciate all your support! Thanks!
HowTo: Record Desktop Session via Byzanz
Byzanz is a new born desktop session recorder for linux. Byzanz records current display sessions and saves them as GIF image files.
Byzanz desktop recorder offers several new features at its early binary age. Byzanz desktop recorder provides support for screen recording with or without cursor movements. Byzanz can also be customized to record desktop session on specific screen size or screen location. This byzanz feature allows a smaller and customized screen size and screen location desktop session recording.
Recorded desktop session file are being saved in GIF file format. GIF files are known to offer and contain framed image animations. Another feature of Byzanz is its capability to generate a looping GIF animation bringing you a non-stop image animation from a single GIF file. The file size of the resulting output GIF file from Byzanz varies widely on session recording time. A 10-second 1280x1024 recorded desktop session can reached a GIF file size of more than 150Kbytes. The resulting GIF file needs no further editing or modification and is ready for image viewing.
Though at its early stage, Byzanz can be a promising desktop session recorder for a frame-by-frame desktop session recorder.
Good job for byzanz though it needs further feature enhancements. One wishful feature can be an GUI-based integrated desktop environment for useful desktop friendliness. More to come and expect from Byzanz developers, so watch out for it soon!
Byzanz Installation
Byzanz though at its early age is available from Fedora Application/Multimedia Project and can be installed using yum.
To install byzan desktop recorder via yum, simply
~~~~~~~~~~~~~~~~~~~~~~~~~~~~~~~~~~~
# yum -y install byzanz
~~~~~~~~~~~~~~~~~~~~~~~~~~~~~~~~~~~
Binary Launch:
Alt+F2, byzanz-record
Sample Usage:
~~~~~~~~~~~~~~~~~~~~~~~~~~~~~~~~~~~~~~~~
# byzanz-record -c -l output.gif
~~~~~~~~~~~~~~~~~~~~~~~~~~~~~~~~~~~~~~~~
My Sample Desktop GIF Session:
Don't see the image animation? Right click on it and open in new browser window or download the file and open it up from your browser.
HTH
Wednesday, November 28, 2007
Linux Scorched 3D Tank Game
Meet Scorched 3D Classic Tank Game.
Scorched 3D is another classic 3D linux tank game that is based on a DOS game polished with more features such as OpenGL supported, multiple player and weapon options, more landscape island war environment spots, LAN-enabled enemies, save and retrieve game levels and more. Scorched 3D tank game can be played by stand-alone or online.
Man Scorched 3D:
Scorched 3D is a game based on the classic DOS game Scorched Earth "The Mother Of All Games". Scorched 3D adds amongst other new features a 3D island environment and LAN and internet play. At its lowest level, Scorched 3D is just an artillery game with two+ tanks taking turns to destroy opponents in an arena. Choose the angle, direction and power of each shot, launch your weapon, and try to blow up other tanks. But Scorched 3D can be a lot more complex than that,
if you want it to be. You can earn money from successful battles and use it to invest in additional weapons and accessories. You can play with up to twenty four other players at a time, mixing computer players with humans. There's a variety of changing environmental conditions and terrains to be dealt with.
Scorched 3D is totally free and is available for both Microsoft Windows and Unix (Linux, FreeBSD, Mac OS X, Solaris etc.) operating systems.
You can pick up the game and begin playing very quickly. Then, when/if you are interested, you can poke in the dimmer recesses of the game and get into the strategy (or just ignore it altogether!).
The main objective of the game is to stand from the rest of the enemy tanks. Last tank standing wins.
Visit Scorched 3D tank game from here.
SCORCHED 3D TANK INSTALLATION MADE EASY
Scorched 3D is available from Fedora Project repos. Thus, the tank game can be installed via yum.
From Fedora 8, simply issue the following yum command for installation.~~~~~~~~~~~~~~~~~~~~~~~~~~~~~~~~~~~~~
# yum -y install scorched3d
~~~~~~~~~~~~~~~~~~~~~~~~~~~~~~~~~~~~~
The above command will install the necessary dependencies including non-installed opengl package. Yum would download an approximately 60 MB of package files.
Screenshots:


More wiki documents can be found from here and mods are widely available from here.
Goodluck and enjoy tank-scorching!
113 Amazing Linux Games
Linux Atomic Battle Tank Game
Here's another linux blog entry covering another nice classic game running on Fedora 8.
Atomic Tanks is a game in which you control an overly-powerful tank and attempt to blow up other highly powerful tanks. Players get to select a number of weapons and defensive items and then attack each other in a turn-based manner. The last tank standing is the winner. More info from here.
Game Play and Objective
Atomic tank game operates on fields and mountains. The objective of this tank game is to throw and shoot a missile against your enemies until they fell down to ground. Shooting the enemies with your missiles takes computational efforts on missile direction, thrust and speed, and trigonometrical angles to completely hit your enemy targets. Missiles comes in many various types. Some of them are heavy in weight, a few missiles are fast in speed, the others covers a wider horizontal bomb craters that also affects the tank ground positioning. You can check out these types of missiles here. The ability to withstand and hit the enemy targets makes you far better than the rest of the enemy tanks. Missile thrust, shotting angle, and speed can be increased and decreased by the player.
Atomic tank game has many optional features. This keyboard driven tank game has the ability to save and load game levels. The tank game offers several computer-based target tank enemies which contributes and increases the difficulty level of the game. The battle grounds and mountain stands in a way that makes the tank game more challenging on launching missile weapons on hidden enemy targets.
Installation and Requirements
Atomic Tank game is part of Fedora Game Project. Atomic Tank game requires a minimum hard disk space. A normal dialup connection would do fine on package dependency downloads and installation. This atomic tank game can be installed via yum on Fedora 8. After a successful tank game installation, the tank game binary is available from Applications > Game > Tank Game.
How to install Atomic Tank Game:
~~~~~~~~~~~~~~~~~~~~~~~~~
# yum -y install atanks
~~~~~~~~~~~~~~~~~~~~~~~~~
Launch: Alt+F2, atanks
ScreenShots: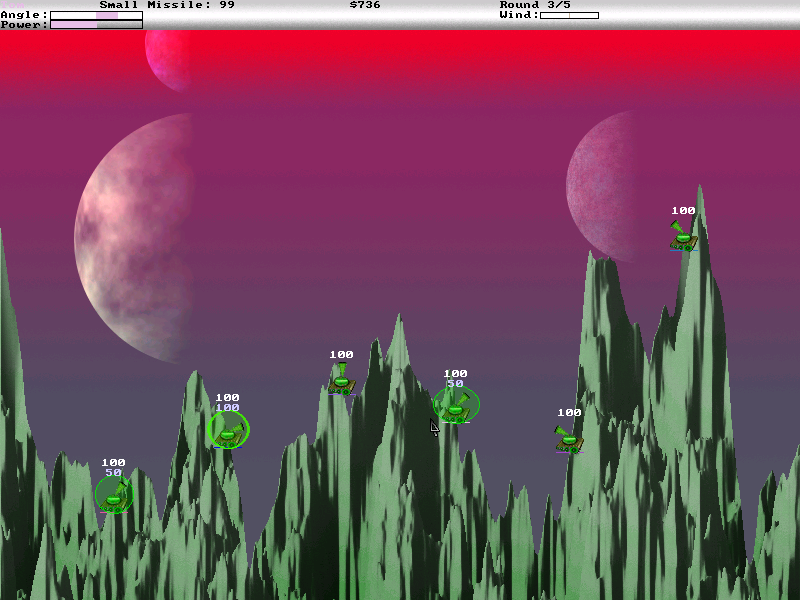


You can view more actual game screenshots here.
All in all, this tank game is a nice classic game to have in a linux desktop. Approved for kids and grandmas for being a user-friendly non-audio toxic easy to play tank game.
Enjoy!
Monday, November 26, 2007
HowTo: Display a Tree of Linux Processes
Everybody knows the benefit of having an overall idea and infrastructure connectivity of your own local network by looking at our own network diagram.
In linux world, being aware and knowing what processes are currently running at all times is one good practice of managing your linux box. This practice involves monitoring of your memory usage on high and low peak hours of one production day. Looking at processes, this gives you a virtual connectivity of daemon services related to other linux process. A virtual map allowing you to be familiarized with other currently running processes.
Here's one linux command to visually display linux process in a tree map.
PSTree shows running processes as a tree. The tree is rooted at either pid or init if pid is omitted. If a user name is specified, all process trees rooted at processes owned by that user are shown.
PSTree can take a user name as an argument and display all running processes of that specific user. PSTree is part of psmisc rpm package and is installed by default on Fedora 8 with X.
PSTree usage:
Basic tree process
~~~~~~~~~~~~~~~~~~~~~~~~~~~~~~~~~~~~
# pstree
~~~~~~~~~~~~~~~~~~~~~~~~~~~~~~~~~~~~
Tree process of specific user
~~~~~~~~~~~~~~~~~~~~~~~~~~~~~~~~~~~~
# pstree root
~~~~~~~~~~~~~~~~~~~~~~~~~~~~~~~~~~~~
Tree process with numerical sorting
~~~~~~~~~~~~~~~~~~~~~~~~~~~~~~~~~~~~
# pstree -n
~~~~~~~~~~~~~~~~~~~~~~~~~~~~~~~~~~~~
Tree process showing ASCII characters to draw the process tree
~~~~~~~~~~~~~~~~~~~~~~~~~~~~~~~~~~~~
# pstree -A
~~~~~~~~~~~~~~~~~~~~~~~~~~~~~~~~~~~~
Tree process displaying PIDS
~~~~~~~~~~~~~~~~~~~~~~~~~~~~~~~~~~~~
# pstree -p
~~~~~~~~~~~~~~~~~~~~~~~~~~~~~~~~~~~~
A sample process tree screenshot:

HTH
Howto: 3 Easy Install Steps of Microsoft Fonts in Fedora 8
There are nice fonts included with the default Fedora 8 X installation. Some people love it, others want more. If you are fond of using Microsoft fonts, here's a quick entry on how to have microsoft fonts installed from your Fedora 8 box.
Three easy steps on how to install Microsoft Fonts in Fedora 8.
===============================================================
1. Install the needed package dependency:
~~~~~~~~~~~~~~~~~~~~~~~~~~~~~~~~~~~~~~~~~
# yum -y install chkfontpath
~~~~~~~~~~~~~~~~~~~~~~~~~~~~~~~~~~~~~~~~~
2. Install Microsoft core fonts rpm package for Fedora 8 directly like so:
~~~~~~~~~~~~~~~~~~~~~~~~~~~~~~~~~~~~~~~~~~~~~~~~~~~~~~~~~~~~~~~~~~~~~~~~~~~~~~~~~~
# rpm -ivh http://vertito.googlepages.com/msttcorefonts-2.0-1.noarch.rpm
~~~~~~~~~~~~~~~~~~~~~~~~~~~~~~~~~~~~~~~~~~~~~~~~~~~~~~~~~~~~~~~~~~~~~~~~~~~~~~~~~~
3. Close all your unsaved data and restart or reload your XFS like so
~~~~~~~~~~~~~~~~~~~~~~~~~~~~~~~~~~~~~
# service xfs restart
~~~~~~~~~~~~~~~~~~~~~~~~~~~~~~~~~~~~~
If you wish to do the long approach, simply follow the approach taken from my old post here.
HTH
Note: All commercial names, trademarks and company mentioned here are all trademarks managed and owned by their own respective company.
Howto: Convert PDF to HTML/XML/PNG in Linux
Here's a quick howto on converting PDF files into HTML file.
PDFtoHTML linux tool converts PDF files into multiple file formats like HTML, XML, and PNG images. By default usage, the output is written to current working folder. PDFtoHTML linux tool is based on XPDF version 3.00. PDFtoHTML PDF converter tool is part of poppler-utils rpm page.
PDFtoHTML INSTALLATION
======================
Here's how to install PDFtoHTML PDF linux converter tool.
By default, PDFtoHTML converts PDF file into HTML file.
# yum -y install poppler-utils
BINARY LAUNCH:
==============
Alt+F2, pdftohtml
PDFtoHTML Usage:
================
When working with PDFtoHTML PDF file converter, all resulting output files are saved on current working directory folder. Here's the simplest way to use this PDF converter tool
# cd /location/of/pdf/file
# pdftohtml testfile.pdf test.html
HTH
Livna Repository on Fedora 8
Livna repo contains thousand of ready made rpm package and installers for linux. If you find it hard to find extra rpm package for Fedora 8, try to install Livna repo and do the search again.
Here's a quick lines on how install Livna repo into Fedora 8.
Simply issue as root
# rpm -ivh http://rpm.livna.org/livna-release-8.rpm
# rpm --import http://rpm.livna.org/RPM-LIVNA-GPG-KEY
Sunday, November 25, 2007
Linux Action Flight Simulator Game
Wiki defines Flight Simulator:
"A flight simulator is a system that tries to replicate, or simulate, the experience of flying an aircraft as closely and realistically as possible. The different types of flight simulator range from video games up to full-size cockpit replicas mounted on hydraulic (or electromechanical) actuators, controlled by state of the art computer technology.
Flight simulators are extensively used by the aviation industry for design and development and for the training of pilots and other flight deck crew in both civil and military aircraft."
In Linux, while doing some yum search, yum lead me to a linux based action flight simulator. This GL-117 is an action flight simulator and flight game. GL-117 flight simulator allows your to simulate and practice flight simulations, plane dog fights, flight maneuvers, accomplish flight missions over the air and above the ground. GL-117 flight simulator offers different practice and flight simulation difficulty levels, variety of flight missions as well.
With GL-117 mission flights, GL-117 offers a computer based fighter plane enemies which serve users a great mission challenge as you try to shoot them with your powerful air-to-air missiles and guns combined with your flight maneuver talents and tactics flying over the long-running mountains, over the valleys and seas. Your fighter plane is equipped with limited missile power and plane bullets that increases your skills over your ammunition management.
Gl-117 offers you three different types of plane namely fighter plane, bomber plane and a commercial flight plane. Gl-117 gives you ammunition powers with different types of missiles that you can use on different levels of missions. You can have air-to-air missiles for plane fight above the ground, and air-to-ground missiles for enemy targets from the ground. Flight squadron planes are also equipped with plane flares and chaffs for defensive air tactic. Using your radar and plane power, guided by your plane radar and sensors, you can use your long range plane guns on shooting down an enemy plane.
GL-117 is an action flight simulator. Enter the Eagle Squadron and succeed in several challenging missions leading though different landscapes. Five predefined levels of video quality and an amount of viewing ranges let you perfectly adjust the game to the performance of your system. Joystick, mouse, sound effects, music and more.
Linux Action Flight Simulator Game
INSTALLATION
============
GL-117 can be installed via yum. Yum install around GL-117 180 files compressed in single package rpm installer.
How to install GL-117 Flight Simulator
# yum -y install gl-117
LAUNCH:
Alt+F2, gl-117
Here are my several GL-117 screenshots:


Final Note
Even if you are not inline with flight simulations, you should try installing this amazing GL-117 flight simulator game! You'll like it too!
Check out GL-117 site here.
Related Post:
113 Amazing Linux Games
Thursday, November 22, 2007
Splitting and Merging Multiple Linux Files
Considering that you have 50MB of single file. Your friend needs it urgently. The situation shows that the ONLY means of transferring this large file between you and your friend is thru email exchanges. The problem is both your ISP limits the size of email attachments to 5MB file attachments.
How to transfer 50MB large file by email?
How to split and merge large chunks of file by email?
How to send big file by email?
How to split big file and rejoin them later from the other end?
Splitting and Merging Multiple Linux Files
Split linux commands chops file into multiple chunks of file. Split command divides a single file into multiple files regardless of file types. Split command is fantastic on handling and splitting binary files, compressed and archived files, text files and any other file types. Split is part of coreutils package.
Here's how to accomplish our objective of splitting large files into pieces and merging them back.
As an example, I have prepared a binary rpm file named testfile.rpm with 18MB filesize. Our objective is to split tesfile.rpm into multiple file pieces and merge them back into the same binary file state from the other end.# ls -la testfile.rpm
-rw-r--r-- 1 root root 18835725 2007-11-23 11:07 testfile.rpm
Spliting the file into multiple file chunks with 4MB as maximum filesize# split -b4000000 testfile.rpm
# ls -la
-rw-r--r-- 1 root root 18835725 2007-11-23 11:07 testfile.rpm
-rw-r--r-- 1 root root 4000000 2007-11-23 12:27 xaa
-rw-r--r-- 1 root root 4000000 2007-11-23 12:27 xab
-rw-r--r-- 1 root root 4000000 2007-11-23 12:27 xac
-rw-r--r-- 1 root root 4000000 2007-11-23 12:27 xad
-rw-r--r-- 1 root root 2835725 2007-11-23 12:27 xae
Notice that the file testfile.rpm as splitted into 5 file chunks, with 4 files having 4MB filesize and 1 file having more than 2MB of filesize. Filename conventions are written alphabetically xaa, xab, xac, xad and xae and so on for larger file.
Since each filesize is less than the 5MB email attachment limit, you can now attach these multiple chunks of file into your email message and send them successfully into the receiving end, bypassing email attachment restrictions of 5MB.
Now, we need to merge them back from the other receiving end. Here's how to do it.
How to merge splitted files into a single big file?
Simply issue these simple commands:# cat xaa xab xac xad xae > newfile.rpm
# ls -la
-rwxr-xr-x 1 root root 18835725 2007-11-23 12:35 newfile.rpm
-rwxr-xr-x 1 root root 18835725 2007-11-23 11:07 testfile.rpm
-rw-r--r-- 1 root root 4000000 2007-11-23 12:27 xaa
-rw-r--r-- 1 root root 4000000 2007-11-23 12:27 xab
-rw-r--r-- 1 root root 4000000 2007-11-23 12:27 xac
-rw-r--r-- 1 root root 4000000 2007-11-23 12:27 xad
-rw-r--r-- 1 root root 2835725 2007-11-23 12:27 xae
The receiving end now has the actual file with simple file splitting and file merging operations.
Have a nice weekend!
HTH
Sort Nth Position of Nth Column of a File in Linux
How to sort file basically?
How to sort a file from the Nth column?
How to sort a file from Nth position of the Nth column?
A quick draw of achieving the above using the sort linux command.
~~~~~~~~~~~~~~~~~~~~~~~~~~~~~~
# cat file.txt
6 4 8123
1 2 3789
4 6 9456
~~~~~~~~~~~~~~~~~~~~~~~~~~~~~~
Let us do a numerical sorting of the file using the basic usage of sort command.
~~~~~~~~~~~~~~~~~~~~~~~~~~~~~~
# sort file.txt
1 2 3789
4 6 9456
6 4 8123
~~~~~~~~~~~~~~~~~~~~~~~~~~~~~~
Another file content sorting with columnar basis.
Sort the 3rd column of a text file
~~~~~~~~~~~~~~~~~~~~~~~~~~~~~~
# sort -nk 3 file.txt
1 2 3789
6 4 8123
4 6 9456
~~~~~~~~~~~~~~~~~~~~~~~~~~~~~~
Now, the sorting the Nth position of the Nth column of a file begins.
Sort the 3rd position of the 3rd column of a text file
~~~~~~~~~~~~~~~~~~~~~~~~~~~~~~
# sort -nk 3.3 file.txt
6 4 8123
4 6 9456
1 2 3789
~~~~~~~~~~~~~~~~~~~~~~~~~~~~~~
How about sorting the 4th position from the 3rd column of a text file?
~~~~~~~~~~~~~~~~~~~~~~~~~~~~~~
# sort -nk 3.4 file.txt
6 4 8123
4 6 9456
1 2 3789
~~~~~~~~~~~~~~~~~~~~~~~~~~~~~~
Good, you get the idea. Hope this helps and thanks for the visits!
This sort command was also included from my old blog entry from here and here.
Stop, Pause, and Continue A Linux Process
On most medium to large scale companies, most demanding production servers I know undergo a few minutes of executing batches of scheduled shell scripts or linux commands. These shell scripts and linux commands consume a lot of time and server work load before finishing certain particular job specially for CPU-cycle-eating scripts and linux commands. Thus lessening server performance and response time to normal daily operations of a non-load-balanced production servers.
How to stop, pause, and continue a currently running process job?
How to create a pending linux shell process?
How to temporarily stop a command?
Here's how to achieve the effect of pausing a linux process.
This blog entry would assume, as an example, running a CPU-cycle-eating linux command, then temporarily pause and stop it, and later on continue executing th process without killing the actual PIDs.
Let's start.
Run updatedb into the background forking a process
~~~~~~~~~~~~~~~~~~~~~~~~~~~~~~~~~~~~~~~~~~~~~~~~~~~~~~~~~~~~~~~~~~~~~~~~~~~~~~~
# updatedb &
~~~~~~~~~~~~~~~~~~~~~~~~~~~~~~~~~~~~~~~~~~~~~~~~~~~~~~~~~~~~~~~~~~~~~~~~~~~~~~~
Determine current process PIDs
~~~~~~~~~~~~~~~~~~~~~~~~~~~~~~~~~~~~~~~~~~~~~~~~~~~~~~~~~~~~~~~~~~~~~~~~~~~~~~~
# ps axuw | grep updatedb | grep -v grep
root 3264 5.2 0.0 3852 800 pts/0 D 12:35 0:00 updatedb
~~~~~~~~~~~~~~~~~~~~~~~~~~~~~~~~~~~~~~~~~~~~~~~~~~~~~~~~~~~~~~~~~~~~~~~~~~~~~~~
Noticed from the above lines that the executed updatedb represent a PID of 3264 . Take note of this as we are going to need this when pausing the process.
Next, confirm that the updatedb linux command is still being processing and running
~~~~~~~~~~~~~~~~~~~~~~~~~~~~~~~~~~~~~~~~~~~~~~~~~~~~~~~~~~~~~~~~~~~~~~~~~~~~~~~
# jobs
[1]+ Running updatedb &
~~~~~~~~~~~~~~~~~~~~~~~~~~~~~~~~~~~~~~~~~~~~~~~~~~~~~~~~~~~~~~~~~~~~~~~~~~~~~~~
Now, let's pause the linux process
~~~~~~~~~~~~~~~~~~~~~~~~~~~~~~~~~~~~~~~~~~~~~~~~~~~~~~~~~~~~~~~~~~~~~~~~~~~~~~~
# kill -STOP 3264
~~~~~~~~~~~~~~~~~~~~~~~~~~~~~~~~~~~~~~~~~~~~~~~~~~~~~~~~~~~~~~~~~~~~~~~~~~~~~~~
Reconfirm if the process is still running
~~~~~~~~~~~~~~~~~~~~~~~~~~~~~~~~~~~~~~~~~~~~~~~~~~~~~~~~~~~~~~~~~~~~~~~~~~~~~~~
# jobs
[1]+ Stopped updatedb
# ps axuw | grep update
root 3264 1.4 0.0 3852 800 pts/0 T 12:35 0:00 updatedb
~~~~~~~~~~~~~~~~~~~~~~~~~~~~~~~~~~~~~~~~~~~~~~~~~~~~~~~~~~~~~~~~~~~~~~~~~~~~~~~
From the issued commands above, we have successfully paused a currently running process. The updatedb process with PID 3264 is now a currently frozen process. Eventually, depending on CPU cycles and disk activity needed by your scheduled batch of shell scripts and linux commands, server work load would gradually decreased then and much more response time would be available for others to use.
As a sample of stopping ,pausing and continuing a linux process, we can now continue executing the currently stopped linux process:
~~~~~~~~~~~~~~~~~~~~~~~~~~~~~~~~~~~~~~
# kill -CONT 3264
~~~~~~~~~~~~~~~~~~~~~~~~~~~~~~~~~~~~~~
Verify that the process is now running
~~~~~~~~~~~~~~~~~~~~~~~~~~~~~~~~~~~~~~~~~~~~~~~~~~~~~~~~~~~~~~~~~~~~~~~~~~~~
# jobs
[1]+ Running updatedb &
# ps axuw | grep updatedb
root 3272 0.0 0.0 4044 672 pts/0 S+ 12:37 0:00 grep update
~~~~~~~~~~~~~~~~~~~~~~~~~~~~~~~~~~~~~~~~~~~~~~~~~~~~~~~~~~~~~~~~~~~~~~~~~~~~
The line below shows that the background process of updatedb was already finished with its job.
~~~~~~~~~~~~~~~~~~~~~~~~~~~~~~~~~~~~~~~~~~~
[1]+ Done updatedb
~~~~~~~~~~~~~~~~~~~~~~~~~~~~~~~~~~~~~~~~~~~
As you can see, the updatedb process was stopped, pause and continued using the 'kill' command.
You might be interested with the shown advertisement from those black boxes around.
HTH
Here is kill description from man page:
The command kill sends the specified signal to the specified process or process group. If no signal is specified, the TERM signal is sent. The TERM signal will kill processes which do not catch this signal. For other processes, it may be necessary to use the KILL (9) signal, since this signal cannot be caught.
Wednesday, November 21, 2007
File Creation without File Opening in Linux
How to create new file without opening an editor or executing a copy / move command?
How to create new multiple files simultaneously?
How to create multiple files with the same timestamps?
How to update file date and timestamps?
Another overly used and unexplained command around this blog.
Touch basically touches and changes file timestamps. Touch updates time modifications of each file arguments to current time of the box. Touch command is part of linux coreutils package, part of GNU. Touch command is installed by default.
Here's how to create a file without actually opening an editor to start editing it or without making use of linux copy and move commands.
~~~~~~~~~~~~~~~~~~~~~~~~~~~~~~~~~~~~~~~~~~~~~~~~~~~~~~~~
# touch newfile.txt
# ls -la newfile.txt
-rw-r--r-- 1 root root 0 2007-11-22 10:09 newfile.txt
~~~~~~~~~~~~~~~~~~~~~~~~~~~~~~~~~~~~~~~~~~~~~~~~~~~~~~~~
If a filename is being passed as an argument to touch command, and the file does not exists, the file is then created with the latest time stamp. Now, if a file is already an existing file from current working folder location, the timestamp of that existing file is being updated by default touch argument. This touch behaviour can be avoided using a specific command line parameter.
Touch linux command accepts both date and time stamp argument.
How to create new multiple files simultaneously?
How to create multiple files with the same timestamps?
~~~~~~~~~~~~~~~~~~~~~~~~~~~~~~~~~~~~~~~~~~
# touch file1.txt file2.txt file3.txt
~~~~~~~~~~~~~~~~~~~~~~~~~~~~~~~~~~~~~~~~~~
# ls -la
~~~~~~~~~~~~~~~~~~~~~~~~~~~~~~~~~~~~~~~~~~~~~~~~~~~~~~~~~~~~~~~
-rw-r--r-- 1 root root 0 2007-11-22 10:15 file1.txt
-rw-r--r-- 1 root root 0 2007-11-22 10:15 file2.txt
-rw-r--r-- 1 root root 0 2007-11-22 10:15 file3.txt
~~~~~~~~~~~~~~~~~~~~~~~~~~~~~~~~~~~~~~~~~~~~~~~~~~~~~~~~~~~~~~~
Noticed from above that they have all the same time stamp of 10:15 and date stamp of 2007-11-22.
For more touch , man touch.
HTH
Concatenate Multiple Files in Linux
File concatenation involves merging of one or multiple file contents into one single file. We all know that 'cat' linux command displays the contents of a file. Cat linux command can also be used to concatenate file contents into a single file. The concatenation command argument follows the following pattern as follows:
# cat inputfile1 inputfile2 ... inputfileN > outputfile
Here are more sample on how to merge and concatenate multiple file(s) of same file types into a single output file using cat.
# cat file1 file2 >> newfile
Legend
~~~~~~~~~~~~~~~~~~~~~~~~~~~~~~~~~~~~~~~~~~
file1 and file2 - input files
">" - output operator for new output file
">>" - ouput operator for existing output file
newfile - output files
~~~~~~~~~~~~~~~~~~~~~~~~~~~~~~~~~~~~~~~~~~
*** Note that if newfile is already existing, it will be overwritten by the merged contents of all input files
More samples of merging contents of multiple files from terminal
The line below creates a new output file called newfile and all contents of new files are merged into the newfile using the redirection ">" operator.
~~~~~~~~~~~~~~~~~~~~~~~~~~~~~~~~~~~~~~~~~~~~~~~~~~~~~~~~~~~~~~~~
# cat file1 file2 file3 file4 file5 file6 > newfile
~~~~~~~~~~~~~~~~~~~~~~~~~~~~~~~~~~~~~~~~~~~~~~~~~~~~~~~~~~~~~~~~
The line below merges all contents of all input files (file1,file2,file3,file4...file6) into an already existing 'existingfile' file using the redirection ">>" operator .
~~~~~~~~~~~~~~~~~~~~~~~~~~~~~~~~~~~~~~~~~~~~~~~~~~~~~~~~~~~~~~~~
# cat file1 file2 file3 file4 file5 file6 >> existingfile
~~~~~~~~~~~~~~~~~~~~~~~~~~~~~~~~~~~~~~~~~~~~~~~~~~~~~~~~~~~~~~~~
Take note that if the output file is already existing, the file access attributes and file ownerships of the output file is preserved. However, the date and time stamps would be changed and updated to current date/time values. This preservation state applies both to ">>" and ">" redirection operators.
Concatenation of files are usually being applied to readable file types, mostly to text date files in linux. Folder path can also be specified with input and output files when concatenating multiple files.
HTH
Renaming Files in Linux
I guess you want to learn how to rename a file? Renaming a file is as easy as copying files. Renaming file takes the mv ( short for move ) linux command. The move command can also be used to move files from source to destination folder location. However, this entry would not cover moving of files in linux.
Move follows the below simple command parameters:
# mv old-filename new-filename
Renaming conditions are simple.
1. Filetypes can be of any filetypes.
2. Old-filename can be of any filename as long as the file is existing on current working folder.
3. The new-filename can be of any filename. Move command would prompt anyway for any existing destination filename.
Here is a sample on how to rename file(s) in fedora linux?
# mv autoexec.bat delete.txt
Move would prompt if the new filename already exists.
HTH
Linux Power Consumption Analysis Tool
Here's a powerful power monitoring tool available from linux world.
PowerTop is a terminal-based linux program that shows power consumption and power analysis on Intel-based laptops and makes suggestions on how to extend battery lifetime.
Powertop site says:
Computer programs can make your computer use more power. PowerTOP is a Linux tool that helps you find those programs that are misbehaving while your computer is idle. The application that misbehaved the most was the Linux kernel. However, as of version 2.6.21, the Linux kernel went tickless, and no longer has a fixed 1000Hz timer tick. The result (in theory) is huge power savings because the CPU stays in low power mode for longer periods during system idle.
However... there are many things that can ruin the party, both inside the kernel and in userspace. PowerTOP combines various sources of information from the kernel into one convenient screen so that you can see how well your system is doing at saving power, and which components are the biggest problems.
POWERTOP INSTALLATION
=====================
Yum has been quite faster than the previous Fedora release. Powertop binary is included from Fedora repo. Simply install powertop package via yum like so
~~~~~~~~~~~~~~~~~~~~~~~~~~~~~~~~~~~~~~~~~~~~~~~
# yum -y install powertop
~~~~~~~~~~~~~~~~~~~~~~~~~~~~~~~~~~~~~~~~~~~~~~~
BINARY LAUNCH
=============
The default time needed by powertop during its program launch is 5 seconds.
# powertop
My screenshot:
This powertop was written by Arjan van de Ven
HTH
Tail and Head Few Lines of Text Files
Another covered blog entry covering tail and heads. Tail and heads have been shown being use from several early blog entries here.
Here's a quick simple instructions on how to tail last or first few lines of a text file. This line can be an obsolete fancy phrase but if would look and read few more lines, the combination of the two can kick and produce a more useful data when used properly.
Here are several ways on how to tail last 10 lines of a text file.
# tail -10 testfile.txt
# tail -10 /var/log/maillog
# grep searchstring /var/log/maillog | tail -10
# cat longway.txt | tail -10
The same pattern goes on how to display the first 10 lines of a text file
# head -10 testfile.txt
# head -10 /var/log/maillog
# grep searchstring | head -10
# cat longway.txt | head -10
The numerical figure 10 can be replace by any non-decimal number.
Here are more samples of using tail and head linux commands to display several lines from textfile.
# tail -50 smallfile.txt
# tail -n50 largefile.txt
# head -50 test.txt
# head -n50 test.txt
This can be handy when creating linux shell scripts on gathering some data statistics from log files. Specifically, this can be helpful on determining a particular file, say a system logfile, on when did the first and last log file occurred from that particular log file, which can be a basis of a numerical value returned by a shell scripts.
There are more other ways to achieve the same effect using one or two linux command combinations.
Let's create a scenario where this two commands can be combined and produce a data useful to us.
# cat logfile.txt
~~~~~~~~~~~~~~~~~~~~~~~~~~~~~~~~~~~~~~~~~~~~~~~
Nov 1 14:56:45 kiddos trying to hack the box
.
sniffed
.
.
.
.
.
Nov 21 4:56:45
Nov 21 6:26:22 kiddos trying to hack the box
~~~~~~~~~~~~~~~~~~~~~~~~~~~~~~~~~~~~~~~~~~~~~~~
From thousand log lines of logfile, and using the head and tail usage shown earlier, we could now conclude several things.
One of them is that there were 2 attempts that kiddos were trying to hack the box between the dates of Nov 1 and Nov 21. This number can also be compared from previous result we get from previous run of the script. Or even dump this number for MRTG to graph.
Most linux commands are really simple by usage, they get more useful and powerful when piped and combined from each other. Thus produce more interesting resulting data.
HTH
Tuesday, November 20, 2007
Three Easy Steps for Opera on Fedora 8
Firefox browser has been around quite long now. Firefox (Mozilla) had served millions of pages since its early versions. There are only a few full featured GUI-based browsers that made it to linux world, one of them is Opera.
Opera site says:
Why Opera? Safe, secure, powerful and fully customizable, the Opera Web browser is faster and more secure than other browsers available on the market. Opera delivers robust security and a far-richer feature set than any other Web browser and it's free.
Opera is the Web pioneer that delivered tabbed browsing in 2000, and Opera 9.2 features lots of other great tricks for quick navigation, including Speed Dial, a quick way to put all of your favorite daily sites at your fingertips. You can also take, save and trade Notes attached to any Web site while browsing, or Create Search shortcuts from any search field on the Web. Opera 9.2 is super fast and free, secure and stable, and offers lots of great tools for Web Developers.
Top Opera features include the following:
Tabbed browsing
Surf the Web easier and faster by opening multiple Web pages within the same application window. demo
Fraud protection
Opera's advanced fraud protection protects you against web sites that try to steal your personal information. Watch the demo to learn how to enable this feature. demo
Add your favorite search engines
Right-click on the site's search field and select "Create search" from the menu.
and more.
To learn more of Opera, visit this link.
Here are quick simple and easy steps on how to install Opera browser into a Fedora 8 linux box.
1. Download Opera linux installer for free from here. Make sure to select the linux version for Fedora. You would see a version for Fedora Core 5, 6 and 7. This brower rpm version is just fine with Fedora 8.
2. Simply install the Opera package using rpm linux installer like so
~~~~~~~~~~~~~~~~~~~~~~~~~~~~~~~~~~~~~~~~~~~~~~~~~~~~~~~~~~~~~~~~~~~~~
# rpm -ivh /downloaded/opera-9.24-20071015.6-shared-qt.i386-en.rpm
~~~~~~~~~~~~~~~~~~~~~~~~~~~~~~~~~~~~~~~~~~~~~~~~~~~~~~~~~~~~~~~~~~~~~
Opera would be installed to Applications > Internet .
3. Launch Opera! Alt+F2, opera
HTH
Alternative Search and Replace Tool
Search and replace can be done from linux terminal in many ways. Here's another alternative blog entry on doing string replacements, search and replace via terminal using replace linux command.
Man replace:
The replace utility program changes strings in place in files or on the standard input.
Invoke replace in one of the following ways:
shell> replace from to [from to] ... -- file [file] ...
shell> replace from to [from to] ... < file
from represents a string to look for and to represents its replacement. There can be one or more pairs of strings.
Use the -- option to indicate where the string-replacement list ends and the filenames begin. In this case, any file named on the
command line is modified in place, so you may want to make a copy of the original before converting it. replace prints a message
indicating which of the input files it actually modifies.
If the -- option is not given, replace reads the standard input and writes to the standard output.
replace uses a finite state machine to match longer strings first. It can be used to swap strings. For example, the following command
swaps a and b in the given files, file1 and file2:
shell> replace a b b a -- file1 file2 ...
If you wish to see more of replace description, see replace man page or visit http://dev.mysql.com/doc/.
Here's a sample of replace command tool created and part of MySQL server package.
# cat testfile.txt
~~~~~~~~~~~~~~~~~~~~~~~~~~~~~~~~~~~~~
paper is not paper
~~~~~~~~~~~~~~~~~~~~~~~~~~~~~~~~~~~~~
# replace paper clouds -- testfile.txt
~~~~~~~~~~~~~~~~~~~~~~~~~~~~~~~~~~~~~
testfile.txt converted
~~~~~~~~~~~~~~~~~~~~~~~~~~~~~~~~~~~~~
# cat testfile.txt
~~~~~~~~~~~~~~~~~~~~~~~~~~~~~~~~~~~~~
clouds is not clouds
~~~~~~~~~~~~~~~~~~~~~~~~~~~~~~~~~~~~~
HTH
Display Lines Beginning with a Given String
The look utility displays any lines in file which contain string as a prefix.
Here's a quick entry on how to display lines that begins with a given string or word.
# cat testfile.txt
~~~~~~~~~~~~~~~~~~~~~~~~~~~~
paper
paper2
this is not paper3
yo yo yo
~~~~~~~~~~~~~~~~~~~~~~~~~~~~
# look -df paper testfile.txt
~~~~~~~~~~~~~~~~~~~~~~~~~~~~
paper
paper2
~~~~~~~~~~~~~~~~~~~~~~~~~~~~
HTH
Spell Check Files via Terminal - Install Howto
Here's another useful command liner utility that can check and correct spelling of a file.
How to check the spelling of a HTML file from terminal?
How to check the spelling of a Latex file from terminal?
How to check the spelling of a nroff/troff file from terminal?
How to check spelling of a file interactively from terminal?
Hunspell is a linux command line checker, stemmer and morphological analyzer linux tools. Hunspell is based on Ispell’s algorithms and OpenOffice.org’s Myspell source code.
HUNSPELL INSTALLATION
=====================
How to install hunspell checking tool?# yum -y install hunspell
HUNSPELL SPELL CHECK USAGE AND SAMPLES
==========================
How to spell check a text file from terminal?# hunspell testfile.txt
How to spell check a HTML/SGML file from CLI?# hunspell -H *.html
# hunspell -H index.html
How to spell check with URL checking?# hunspell --check-url index.htm
How to spell check a file and add a personal dictionary?# hunspell -p myowndictionary.txt bigtext.txt
Below are several interactive function keys inside hunspell shell checking in text mode:
R      Replace the misspelled word completely.
Space  Accept the word this time only.
A      Accept the word for the rest of this hunspell session.
I      Accept the word, capitalized as it is in the file, and update private dictionary.
U      Accept the word, and add an uncapitalized (actually, all lower-case) version to the
private dictionary.
0-n    Replace with one of the suggested words.
L      Look up words in system dictionary (controlled by the WORDS compilation option).
X      Write the rest of this file, ignoring misspellings, and start next file.
Q      Exit immediately and leave the file unchanged.
!      Shell escape (not implemented).
^L     Redraw screen.
^Z     Suspend ispell.
?      Give help screen.
It's fun and poweful terminal-based spell checker tool, you should try it!
RELATED:
This blog entry is also an alternative to related posting take here.
HTH
Display Linux Session Jobs
There are times that we execute and let our scripts and/or applications to be executed from the current session inside linux terminal while doing another work. Sometimes we gave them varied process priorities as well no to interfere with other box operations and process. This is also helpful specially to those linux boxes managed by several root sysadmins. Tnis can also be executed from non-root user linux acount.
Here's how to list down and display all currently running jobs from the current session?
First, let us simulate a linux command to run in the background as shown below:
~~~~~~~~~~~~~~~~~~~~~~~~~~~~~~~~~~~~~~~~~~~~~~~
# updatedb &
~~~~~~~~~~~~~~~~~~~~~~~~~~~~~~~~~~~~~~~~~~~~~~~
The & character tells the linux to execute to the background process, thus leaving a currently running job from the currently logged in user.
Now, here's how to list down a currently running jobs from your current session. Simply
# jobs
Result:
~~~~~~~~~~~~~~~~~~~~~~~~~~~~~~~~~~~~~~~~~~~~~~~
[1]+ Running updatedb &
~~~~~~~~~~~~~~~~~~~~~~~~~~~~~~~~~~~~~~~~~~~~~~~
Another example.
Let's leave the find command to run into the background process like so
Run find into the background
# find /usr -name *.ver &
Check the running jobs from the background
# jobs
[1]+ Running find /usr -name *.ver &
Display PIDS of the running jobs in the background
~~~~~~~~~~~~~~~~~~~~~~~~~~~~~~~~~~~~~~~~~~~~~~~~~~~~~~~~~~~~~~~~~~~~
# jobs -p
11999
# jobs -l
[1]+ 11999 Running find /usr -name *.ver &
~~~~~~~~~~~~~~~~~~~~~~~~~~~~~~~~~~~~~~~~~~~~~~~~~~~~~~~~~~~~~~~~~~~~
Ofcourse, using the linux 'ps' terminal command would also list down the job, with combination of grep filtering command as shown below
~~~~~~~~~~~~~~~~~~~~~~~~~~~~~~~~~~~~~~~~~~~~~~~~~~~~~~~~~~~~~~~~~~~~
# ps axuw | grep find
root 11999 3.3 0.1 5088 1840 pts/4 D 13:42 0:00 find /usr -name *.ver
~~~~~~~~~~~~~~~~~~~~~~~~~~~~~~~~~~~~~~~~~~~~~~~~~~~~~~~~~~~~~~~~~~~~
There are more linux command on manipulating, moving, pausing and stopping a currently running linux job from current session.
Related:
To list out user's cron jobs, check here.
To read more cron job scheduling usage and samples, view it here.
HTH
Monday, November 19, 2007
Get Linux Disk Space and Usage
Here's is a command that shows several usage and ways of retrieving disk space usage. This disk space usage command is another abused and bypassed linux command that has been repeated over and over again from samples and old linux blog entries among the blog entries around here.
Here's a quick run covering details and samples on how to determine and show disk space (available and free) from your current harddisk using the 'df' linux command.
As root, simply
# df
~~~~~~~~~~~~~~~~~~~~~~~~~~~~~~~~~~~~~~~~~~~~~~~~~~~~~~~~~~~~~~~~~~~
Filesystem 1K-blocks Used Available Use% Mounted on
/dev/sda5 27925596 8167952 18316216 31% /
/dev/sda1 46362180 27650596 16356460 63% /data
/dev/sda2 101105 11644 84240 13% /boot
tmpfs 509348 0 509348 0% /dev/shm
~~~~~~~~~~~~~~~~~~~~~~~~~~~~~~~~~~~~~~~~~~~~~~~~~~~~~~~~~~~~~~~~~~~
Legend:
~~~~~~~~~~~~~~~~~~~~~~~~~~~~~~~~~~~~~~~~~~~~~~~~~~~~~~~~~~~~~~~~~~~
First column - disk partition name
Second column - total partition allocation
Third column - total used disk space on the specified disk partition
Fourth column - total free or available disk space on the specified disk partition
Fifth column - equivalent disk space allocation in percentage
Sixth column - mount point name of the specified disk partition
~~~~~~~~~~~~~~~~~~~~~~~~~~~~~~~~~~~~~~~~~~~~~~~~~~~~~~~~~~~~~~~~~~~
A human readable harddisk space report covering dummy file system would be
# df -ah
~~~~~~~~~~~~~~~~~~~~~~~~~~~~~~~~~~~~~~~~~~~~~~~~~~~~~~~~~~~~~~~~~~~
/dev/sda5 27G 7.8G 18G 31% /
proc 0 0 0 - /proc
sysfs 0 0 0 - /sys
devpts 0 0 0 - /dev/pts
/dev/sda1 45G 27G 16G 63% /data
/dev/sda2 99M 12M 83M 13% /boot
tmpfs 498M 0 498M 0% /dev/shm
none 0 0 0 - /proc/sys/fs/binfmt_misc
~~~~~~~~~~~~~~~~~~~~~~~~~~~~~~~~~~~~~~~~~~~~~~~~~~~~~~~~~~~~~~~~~~~
To list down inode information instead of hard disk block usage
# df -ih
~~~~~~~~~~~~~~~~~~~~~~~~~~~~~~~~~~~~~~~~~~~~~~~~~~~~~~~~~~~~~~~~~~~
Filesystem Inodes IUsed IFree IUse% Mounted on
/dev/sda5 6.9M 210K 6.7M 3% /
/dev/sda1 5.7M 31K 5.6M 1% /data
/dev/sda2 26K 32 26K 1% /boot
tmpfs 125K 1 125K 1% /dev/shm
~~~~~~~~~~~~~~~~~~~~~~~~~~~~~~~~~~~~~~~~~~~~~~~~~~~~~~~~~~~~~~~~~~~
A sample disk space output of RAIDed SCSI disks over LVM partitions
# df -vh
~~~~~~~~~~~~~~~~~~~~~~~~~~~~~~~~~~~~~~~~~~~~~~~~~~~~~~~~~~~~~~~~~~~
Filesystem Size Used Avail Use% Mounted on
/dev/cciss/c0d0p2 22G 12G 9.1G 56% /
/dev/cciss/c0d0p3 43G 36G 4.5G 89% /backup
/dev/cciss/c0d0p1 99M 20M 75M 21% /boot
/dev/mapper/VolGroup00_home-LogVol00_home
67G 18G 46G 29% /home
/dev/mapper/VolGroup00_var-LogVol00_var
67G 42G 22G 66% /var
~~~~~~~~~~~~~~~~~~~~~~~~~~~~~~~~~~~~~~~~~~~~~~~~~~~~~~~~~~~~~~~~~~~
By default, df does not do 'sync' before the disk usage is retrieved.
To invoke disk sync before showing disk usage information would be
# df -ah --sync
To customize the disk byte block size when checking disk space usage would be:
(assuming a 2K per disk block)
# df -avh -B2048
To retrieve disk usage and file system types using df would be
# df -avhT
~~~~~~~~~~~~~~~~~~~~~~~~~~~~~~~~~~~~~~~~~~~~~~~~~~~~~~~~~~~~~~~~~~~
Filesystem Type Size Used Avail Use% Mounted on
/dev/sda5 ext3 27G 7.8G 18G 31% /
/dev/sda1 ext3 45G 27G 16G 63% /data
/dev/sda2 ext3 99M 12M 83M 13% /boot
tmpfs tmpfs 498M 0 498M 0% /dev/shm
~~~~~~~~~~~~~~~~~~~~~~~~~~~~~~~~~~~~~~~~~~~~~~~~~~~~~~~~~~~~~~~~~~~
***Note the second column that shows the file system types
To show disk space usage with exclusion to specific file system would be
# df -vhT -x tmpfs
Filesystem Type Size Used Avail Use% Mounted on
~~~~~~~~~~~~~~~~~~~~~~~~~~~~~~~~~~~~~~~~~~~~~~~~~~~~~~~~~~~~~~~~~~~
/dev/sda5 ext3 27G 7.8G 18G 31% /
/dev/sda1 ext3 45G 27G 16G 63% /data
/dev/sda2 ext3 99M 12M 83M 13% /boot
~~~~~~~~~~~~~~~~~~~~~~~~~~~~~~~~~~~~~~~~~~~~~~~~~~~~~~~~~~~~~~~~~~~
***Note that the tmps file system has been excluded from being listed
To send these disk space reports to your email, simply follow the old link here.
HTH
Change Linux RunLevels Howto
Runlevels on linux OS presents major differences on how your linux box will boot up and behave. Runlevels on linux changes a variety of execution patterns on loading up INIT process, environment, kernel modules, applications and services when booting up a linux box.
In Linux, runlevels are represented by /etc/inittab text file. The default runlevel is always specified from /etc/inittab text file.
Currently there are several runlevels that exist and being supported by linux boxes. Here are the most currently used runlevels :
~~~~~~~~~~~~~~~~~~~~~~~~~~~~~~~~~~~~~~~~~~~~~~~~~~~~~~~~~~~~~~~~~~~~~~~~~~~~~~~~~
Runlevels Descriptions
0 - halt
1 - Single user mode
2 - Multiuser, without NFS (The same as 3, if you do not have networking)
3 - Full multiuser mode (terminal mode)
4 - unused
5 - X11 (X mode)
6 - reboot
~~~~~~~~~~~~~~~~~~~~~~~~~~~~~~~~~~~~~~~~~~~~~~~~~~~~~~~~~~~~~~~~~~~~~~~~~~~~~~~~~
The most commonly used runlevels in a currently running linux box are 3 and 5. You can change runlevels in many ways.
A runlevel of 5 will take you to GUI enabled login prompt interface and desktop operations. Normally by default installation, this would take your to GNOME or KDE linux environment. A runlevel of 3 would boot your linux box to terminal mode (non-X) linux box and drop you to a terminal login prompt. Runlevels 0 and 6 are runlevels for halting or rebooting your linux respectively.
Here are a quick run down on how to change runlevels in several ways:
How to change the default runlevel?
-----------------------------------
To change the default runlevel in fedora ,edit /etc/inittab and find the line that looks like this:
id:5:initdefault:
The number 5 represents a runlevel with X enabled (GNOME/KDE mostly). If you want to change to runlevel 3, simply change this
~~~~~~~~~~~~~~~~~~~~~~~~~~~~~~~~~~~
id:5:initdefault:
~~~~~~~~~~~~~~~~~~~~~~~~~~~~~~~~~~~
to this
~~~~~~~~~~~~~~~~~~~~~~~~~~~~~~~~~~~
id:3:initdefault:
~~~~~~~~~~~~~~~~~~~~~~~~~~~~~~~~~~~
Save and reboot your linux box. Your linux box would now reboot on runlevel 3, a runlevel without X or GUI. Avoid changing the default /etc/iniittab runlevel value to 0 or 6 .
How to change runlevel during bootup time?
------------------------------------------
When currently booting, press any key to take you to GRUB boot menu. Choose your desired kernel version and press 'e' to edit or modify the kernel argument. Simply append the runlevel you wish to boot up from. If you wish to boot to runlevel 3, simple append 3 from the last kernel argument separated by a space, press enter when done. Now press 'b' to continue and boot from your saved or modified kernel parameters. This would take you to the changed runlevel you have just specified.
How to change your current runlevel or on-the-fly runlevel?
-----------------------------------------------------------
If you wish to change from runlevel 5 to runlevel 3, simply issue as root
~~~~~~~~~~~~~~~~~~~~~~~~~~~~~~~~~~~
# telinit 3
~~~~~~~~~~~~~~~~~~~~~~~~~~~~~~~~~~~
Special runlevels can also be specified by telinit.
~~~~~~~~~~~~~~~~~~~~~~~~~~~~~~~~~~~~~~~~~~~~~~~~~~~~~~~~~~~~~~~~~~~~~~~~~~~~~~~~~~~~~~~~~
Runlevels Description
a,b,c process only those /etc/inittab file entries having runlevel a,b or c.
Q or q re-examine the /etc/inittab file.
S or s switch to single user mode.
U or u re-execute itself. No re-examining of /etc/inittab file happens.
7- 9 undocumented and reserved
~~~~~~~~~~~~~~~~~~~~~~~~~~~~~~~~~~~~~~~~~~~~~~~~~~~~~~~~~~~~~~~~~~~~~~~~~~~~~~~~~~~~~~~~~
If you wish to see more telinit argument, man telinit. Be careful with /etc/inittab file when changing your default runlevel.
Audacious - Install Howto
Audacious
If you are looking for alternative linux music player besides from XMMS and Amarok, here's another music player that is making it from linux world as well.
Audacious site:
Audacious is a free software media player for POSIX standards compliant based systems. It is a fork of Beep Media Player 0.9.7.1. William "nenolod" Pitcock decided to fork BMP after the original development team announced that they were stopping development, in order to create a next-gen version, BMPx.
The reasons for the fork were purely technical. There were some quirks in Beep Media Player that had annoyed users, such as the ID3v2 tag handling, which had been reported as "buggy" by some users. The developers also had their own ideas about how a player should be designed, which they wanted to try in a production environment. Besides, Beep Media Player allegedly lacked functionalities that were considered useful for people who did streaming, such as support for an XMMS-like "songchange plugin".
Audacious has a lot of features, you can check them out here.
Audacious supports several plugins named below:
* Decoder plugins, which contain the actual codecs used for decoding content.
* Transport plugins, which are lowlevel and implemented by the VFS layer.
* General plugins, which provide user-added services to the player (such as sending tracks with AudioScrobbler)
* Output plugins, which provide the audio system backend of the player.
* Visualization plugins, which provide visualizations based on FFT fourier transforms of the wave data.
* Effect plugins, which provide various sound processing on the decoded audio stream
* Container plugins, which provide support for playlists and other similar structures.
* Lowlevel plugins, which provide miscellaneous services to the player core and are not categorized into any of the other plugins.
The long list of audacious music player plugins are listed here.
Here's how to install Audacious music player
============================================
~~~~~~~~~~~~~~~~~~~~~~~~~~~~~~~~~~~~~~~~~~~~~~~~~~~~~~~~~~~
# yum install audacious audacious-plugins-nonfree-*
~~~~~~~~~~~~~~~~~~~~~~~~~~~~~~~~~~~~~~~~~~~~~~~~~~~~~~~~~~~
Binary Launch
==============
Alt+F2, audacious
Here's my screenshots:
If you want to view more screenshots, click here.
Amarok - Howto Install
Rediscover music with amarok.
Amarok is a free music player for Linux and Unix with an intuitive and skinnable interface. Amarok makes playing the music you love easier than ever before - and looks good doing it.
From wiki:
Amarok serves many functions rather than just playing music files. For example, Amarok can be used to organize a library of music into folders according to genre, artist, and album, can edit tags attached to most music formats, associate album art, attach lyrics, and automatically "score" music as you play it. Thus, the first run of Amarok can be daunting for some users. Users that find the interface difficult to navigate due to the many features may hide some features (such as by closing tabs) but may simply prefer a simpler audio player. The abundance of features has also attracted some criticism that Amarok is resource-intensive or "bloated."
Although a more technical list of features is listed below, here are the primary functions or uses for Amarok:
* Playing media files in various formats including but not limited to (depending on the setup) FLAC, Ogg, MP3, AAC, WAV, WMA, and Musepack. Note that Amarok will not play digital music files embedded with DRM.
* Tagging digital music files (currently Ogg, WMA, AAC, MP3, and RealMedia).
* Associating cover art with a particular album, and retrieving the cover art from Amazon.com
* Creating and editing playlists, including smart and dynamic playlists. The dynamic playlists can use such information as the "score" given to a song by an Amarok script, and the playcount which is stored with the song.
* Synchronizing, retrieving, playing, or uploading music to digital music players, such as iPods or Creative Zens.
* Displaying artist information from Wikipedia and retrieving song lyrics.
* Last.fm support, including submitting played tracks (including those played on some digital music players) to Last.fm, retrieving similar artists, and playing Last.fm streams.
* Podcast
Amarok can be installed both on GNOME and KDE, the X freedom.
Here's a quick jump on how to install Amarok on Fedora 8. Simply follow these simple procedures:
INSTALL HOWTO
=============
As root, simply issue
~~~~~~~~~~~~~~~~~~~~~~~~~~~~~~~~~~~~~~~~~~~~~~~~
# yum install amarok
~~~~~~~~~~~~~~~~~~~~~~~~~~~~~~~~~~~~~~~~~~~~~~~~
Due to legalities, non-free music formats are not supported by Fedora. However, you can install support for those non-free music format such as MP3 and AAC
~~~~~~~~~~~~~~~~~~~~~~~~~~~~~~~~~~~~~~~~~~~~~~~~
# yum install amarok-extras-nonfree
~~~~~~~~~~~~~~~~~~~~~~~~~~~~~~~~~~~~~~~~~~~~~~~~
The above requires an existing livna repo. Livna repo installation can be done by visiting this link and this link for later fedora version.
BINARY LAUNCH
=============
Alt + F2, amarok
SCREENSHOTS
===========

Amarok music player also supports various applications themes. You take a look several themes from the site.
Saturday, November 17, 2007
Sun Java on Fedora 8 Install HowTo
I am now here creating an installation howto of Sun Java on my newly installed Fedora 8 box. It took me a few days trying to make the latest Sun's Java work perfectly with my F8, which was the main reason why the recent blog entry was created too.
Fedora 8 ships with its own version of Java clone which works out right as well. However if you wish to install Sun's Java version, read more below.
There was a bug from Sun's Java on which you can read more from here.
This linux blog entry aims to avoid those dirty attempts and headaches on trying to successfully install Sun's Java on F8. The current Sun Java version as of this writing is 1.6.0_03 .
IT IS important to install one java version only, either a java from Fedora 8 or from Sun.
Java IcedTea Installation Removal
Now, to remove the Java version that comes from Fedora 8 distro, simply# yum remove java-*-icedtea java-*-icedtea-devel java-*-icedtea-plugin
SUN JAVA INSTALLATION on FEDORA 8
Here are the simple steps on how to install Sun Java on Fedora 8 and make it work.
Step One
Download Sun Java's self-extracting file (roughly 18MB) from here.
This type of Sun Java installation would proceed to rpm-based mode of installation. Make sure you choose the RPM self-extracting file from the site.
Step Two
Launch your terminal. Install the following library modules needed by Sun Java.# yum -y install compat-libstdc++-33 compat-libstdc++-296
FOR RPM-BASED INSTALLATION
(thanks to Hilel for noticing a mixed non-rpm and rpm based installation instructions)
Step Three
Now, go to your downloaded self-extracting file and issue the following commands# cd ~Desktop
# chmod 700 jre-6u3-linux-i586-rpm.bin
# ./jre-6u3-linux-i586-rpm.bin
The package then shows license and agreement terms where in you need to accept before you can proceed with the installation process. You can hit spacebar to scroll down. To jump direct to the bottom part of the agreement page, simply press 'q' and type yes to finally accept the license terms.
The above will then install the rpm package into your F8 box.
Step Four
4. After successful rpm installation, simply# cd /usr/lib/firefox-2.0.0.8/plugins
# ln -s /usr/java/jre1.6.0_03/plugin/i386/ns7/libjavaplugin_oji.so
Sun Java Installation Verification on Fedora 9
Confirm that F8 knows the location of Sun's Java binary# java -version
You should be seeing similar result like so:java version "1.6.0_03"
Java(TM) SE Runtime Environment (build 1.6.0_03-b05)
Java HotSpot(TM) Client VM (build 1.6.0_03-b05, mixed mode, sharing)
Now, apply the quick fix for the current bug like so# sed -i 's/XINERAMA/FAKEEXTN/g' /usr/java/jre1.6.0_03/lib/i386/xawt/libmawt.so
5. Close and re open your firefox. You should be seeing Sun's initial windows as shown below
Sun Java's initial image greeting like so:
Proceed with Java's test page from any link here.
The above successful Sun's Java installation was done on a newly installed Fedora 8 box. The box does not contain any non-Sun Java version.
You might be interested with the black box around, thanks for any support. Have a nice weekend!
***Propriety and commercial software and packages mentioned here are all trademarks and copyrights owned and managed by their own respective company.
Related Articles:
Sun Java Installation on Fedora 9
Java IcedTea Installation on Fedora 8
Sun Java and Java IcedTea Simultaneous Installation on Fedora
Friday, November 16, 2007
My Fedora 8 Diary
Fedora 8 is the latest rpm-based linux distribution managed and operated by Planet Fedora which offers the latest and free open source linux softwares. Born to be Fedora Core continuous to be a fully established bleeding-edge razor-sharp linux distro for desktop and production servers. Fedora 8, released 7 days ago is now available to many mirror sites from the web.
I am writing this blog entry for me to have my own record keeping Fedora desktop linux installation and diary.
Yes, I am proud that I am currently using Fedora 8 as my current desktop now.
GETTING FEDORA 8
Downloading Fedora 8 is really quite easy using bittorrent downloader software. Fedora 7 was my current OS then when I downloaded Fedora 8. You can also get Fedora 8 torrent file from here. If you have slow connection, it is suggested to downloade F8 before any nice midnight TV show.
Early morning of the the next sunrise, I begun that day with a nice grin from my face. Yes, I had a big grin aware that my F8 ISO finished earlier than I've expected it to be. Amazed to realized that it was not even time for my breakfast coffee.
FEDORA 8 INSTALLATION PREPARATIONS
I have been a full time Fedora fanatic since her very first core release. I never miss out any single year of not having a Fedora OS upgrade or Fedora fresh new installation. I make it appoint to myself that I should have every ISO of every Fedora release.
And then, I decided to do Fedora 8 installation in evening. Before any F8 installation and complete F7 OS erasure, it is a must to prepare several things. This includes the norms of file and folder movements from source to backup destination point. Ofcourse, I have to do it manually. Additionally, I had to jot down those existing partitions that needs to be freshen up, formatted and even merged with other partitions, as I require more hard diskspace this time around. Formatting everything with only exception to /dev/sda1 which was my /data backup partition. It is also where the F8 DVD ISO is currently located.
Moving more than 30 gigabytes of data, comprised of downloaded files, installers, multimedias, not to mention my large email box files have eaten more time than I expected. Luckily, my backup partition have enough free disk space to accommodate all my backup data.
Taking a note, my Fedora-8-i386-DVD.iso file needs to sit down and stay into my backup partition harddisk as my DVD writer is not currently around my table that time. I was going to do the traditional mode of installation via CD/DVD source drive but I was forced to have an installation via local hard disk or from another linux host around my own network.
HARDDISK MODE OF INSTALLATION
I have chosen the harddisk mode of installation. FAILED!
I was in Anaconda installer right after the parameter prompt for ISO source. Anaconda installer continued and was trying to access my ISO file from /tmp/hdimage/data/F8/Fedora-8-i386-DVD.iso. I was expecting it to be /dev/sda1/data/F8/Fedora-8-i386-DVD.iso as this was my submitted parameters to Anaconda prompts for installation source. What a confusion!
I tried several combinations guessing that I can still proceed with the hard drive mode of installation.
Here are several failed sets of parameter inputs that I have tried as ISO source location:
/dev/sda1 and /data/F8/Fedora-8-i386-DVD.iso
/dev/sda1 and //data/F8/Fedora-8-i386-DVD.iso
/dev/sda1 and data/F8/Fedora-8-i386-DVD.iso
/dev/sda1 and Fedora-8-i386-DVD.iso
I am aware that I need not to reboot to Fedora 7 and do MD5SUM checksum as I believe bittorrent software is capable of on-the-fly CRC data checking during the data transfers between source and destination. I also knew that my backup partition and Fedora DVD ISO parameter is correct as well. After several minutes of trying those several input strings, I have to give up.
NETWORK-BASED INSTALLATION MODE
And so I reboot to F7 and did some boot grub changes. I also prepared a separate fedora-box ready to serve as NFS server as my F8 installation plan this time is to do a NFS mode of installation.
I have to transfer almost 4GB between my box and the said temporary NFS server. Doing the NFS server did not take me more than two minutes but transferring more than 4GB, whoaah, I have to take a small coffee break.
Back to installation attempt via NFS server, anaconda gave me a different screen prompts this time around since I have chosen the NFS mode. SUCCESS!
I immediately noticed an improved interaction of the screen from mouse inputs - faster OS response! Followed by a well polished sleed design of anaconda GUI screens, a well highlighted bluish color of the percentage bar and window icons. I have to say, that the F8 artwork have been tremendously improved compared to recent version.
Not to mention, a faster boot up time even with more modules and services enabled. Oh, I did not use a kickstart file during my NFS mode of installation. This was my intention as I would like to experience my very first attended Fedora 8 installation.
Choosing all the needed package that I need does not take too much time as I know what I require first hand. I plan to have the least priority softwares and be installed later on. This time around, I haved added to install the KDE environment to actually see the improvements donefrom Fedora 8.
At this point, I have to leave and have another longer coffee break and get back after 25 minutes or less.
It was all done!
Yes, less than 25 minutes is all it takes to get all things installed. I arrived to my desktop and the screen was already showing me the firstboot initial screen prompt. A minute after a secondary reboot, I was stunned by latest GNOME user login prompt presented with a minty blueish login screen colors. This login prompt is capable of multi-user enabled. I have to add another F8 points for that one.
Later on, I plan to have a total Fedora 7 to Fedora 8 upgrade from DVD drive or via yum isolated alone inside a virtual environment.
INSIDE FEDORA 8
After moving back my home data files including all my email boxes, and browser favorites, I now continue the usual yum installation steps so I can take a peep of what's new, what are installed, their application features, software improvement and the like.
In several terms, I manage to have these diaries with specific applications. Here are several of them:
Gnome / X.Org
Fedora 8 has a much faster and more responsive X in comparison with older version. It was quite noticeable from the eyes of an old Fedora user.
One thing is still there, clicking the maximize and minimize still shows those slow rectangles trying to follow each other. Whatever those black rectangle lines are doing, it was noticeably slow.
There are several defaults that were visible from taskbar and menubar. Those changes increases the distro's user-friendliness. Default folders and folder locations were also added and maintained from Places like Videos, Pictures, and Documents. The System menu shows a different sub-tree-style of categorized program menus and options. These screen changes add more flavors and friendliness to users in general.
Video Card
Considering that I have an Intel-based video card capable of 3D graphics rendering, I now proceed testing F8 Desktop Effects features which quite impressed me. The cube rotation is far more faster and timing to mouse movements. The wobbly effects are tremendously amazing in comparison with F7 desktop effects performance. My detected video card is Intel 82865G.
Monitor
My cheap flat screen monitor was fairly detected as well. And so I still have a viewing comfort using a wide 17 inch GNOME screen.
Screen Fonts
I am not really in line with more graphics, icon editing, long-docs typing and fonts-matching kind of field and hobby, so I would leave this uncommented.
Network Card.
Both my on-board based Intel 82801 and 3Com 3cSOHO network cards were successfully detected and installed. These NICs were both transmitting and receiving broadcast packets right. This was another improvement as I had an epileptic experience with Intel 82801 over Fedora 7, which serves the network in a random fashion.
Sound Card
My on-board sound card was detected but driver was not properly installed. I have an Intel 82801 AC'97 audio controller using snd-intel8x0 sound module. This was normal as always with Fedora previous versions. I just need to do some tweaks with modprobe.conf to get it working. Will do that later on.
Keyboard / Mouse
All I need to have is an adjustment with my mouse motion preferences since I have a 17 inch screen, I need a faster mouse acceleration motion compared to smaller video screens.
Memory
Additionally, Fedora 8 comes with bundled daemon services which were enabled and turned on during initial reboots compared to already customized daemon services with Fedora 7. One thing I noticed was a higher free memory state when using GNOME X. I am assuming that Fedora 8 might perform faster than Fedora 7 on data buffering operations with X enabled.
Floppy/CD/DVD
Detection and installation is no problem at all.
USB Ports
Perfect, works great!
Firefox
Currently F8 is using firefox version 2.0.0.8. I felt the same operation and usage speed from the all latest firefox. I have also tried a tar ball version of firefox 2.0.0.9 which was a little bit slower than the previous firefox. I have a 17 inch monitor so no doubt my browsing experience was more interactively comfortable in terms of mouse-to-screen browsing operations.
All my browser plugins were checked and properly upgraded. I had to increase the cache size according to my needs, I am a heavy browser.
Thunderbird
Moving back my emails dating from Jan 1 2007 up to this date took only a few minutes. I just launched Thunderbird and amazingly recognized all my email account settings including the global inbox and emails. To my amazement, my Enigmail OpenPGP was still installed with F8 Thunderbird even without installing the enigmail package. I also noticed a faster execution of sending and receiving of mails.
Evolution Mail Software
I never use evolution as I prefer Thunderbird
Adobe Flash Web Plugin
Successully installed it for two times. I first did it manually using yum and secondly upon launching of firefox. Firefox's auto plugin mechanism detected that adobe flash plugin was not currently installed. I never encounter any problems installing adobe flash via firefox web plugin. I installed the Adobe web plugin for two times though I never revert back and uninstall the Adobe plugin and start first from firefox automatic plugin installation.
GAIM/Kopete
I never noticed any improvement with Kopete and Gaim or I just never diddled with each new application features covered by GAIM and Kopete. Bottomline, the feeling of using these messengers becomes more lighter due to quite improved faster X response to currently opened applications.
Java
By default yum installation, the Java that comes with Fedora 8 works out pretty well. I even went to Sun's test page to further test it. All went fine. However, I have several old Java-based applications that works perfectly even with older java version. Sadly, I cannot use those applications using the Java that Fedora 8 had. I even install Sun's latest java but those two java-based applications were does not launch perfectly well, and so I cannot use them yet. Those application were working perfectly before with Fedora 7 though I was using Sun's java then. I still am having a hard time up until now trying to make my old javalite to work with the latest Javas from F8 and Sub\n.
Gimp
F8 Gimp was absolutely improved. Gimp now loads its software and plugins faster than ever. Gimp also shows more enticing artwork from its menu icons compared to previous one.
Remote Desktop
Rdesktop shows a faster connection. I did not notice any bugs or like using this remote desktop tool.
GNOME Terminal
Never been happier with GNOME terminal, just perfect for me.
OpenSSH
I never noticed any glitch as of this time working with any box via openssh from my box.
Multimedia - Video / Audio
VLC is my fave video player, so I am quite satisfied with VLC still. Never noticed any performance improvement, but features are quite more flexible. VLC only need less than 20 dependencies.
Since Fedora does not come with non-free applications, you have to get alternative repos and get those non-free package for you to install them.
XMMS
XMMS player were guite improved including plugins and library achieving a better sound quality and performance for me. It was long since I played MP3 again, so the sounds are excellent! The plugins are great too! There were around 32 dependencies when installing a complete XMMS, not bad even for a dialup connection.
Screen Shots
Gnome screenshot is quite flexible in terms of feature enhancement. However, I am fond of using KDE snapshot software which works just fine for me.
Software and Package Management
I never had any problems with software and package management as I always prefer the use of yum via terminal on software installations and updates. Yum is quite faster now and much more improved than what is it before from F7. Yum takes care of my installation and update including software dependencies the way I like it to be - terminally.
I am sure Fedora developers have given hard time getting this pretty power F8. However, a big attention and improvement needs to be taken care of when using this nice Fedora 8 GUI-based software and program management as it still takes long time for its initial launch.
The GUI-based software and package management for Fedora 8 may need a ferrari car to boost up against the other GUI based package management.
Fedora 8 Bottomline
A faster boot up time is noticeably even with the initial daemon services enabled. Though drivers and hardware detections were the same speed compared with F7 with regards to my current hardware specs as I need more external hardware and devices to further test this hardware detection with F8 issues.
Data transfer between hosts is also faster than before. Even local harddisk copying is quite amazing.
Quite impressive with the improvement and changes made from Fedora 7. Multi user session has been polished and enhanced. X was a big improvement in terms of response time and user interaction. Major bugs were eliminated between user desktop switching.
Fedora 8 had improved amazingly and boosted far with other nice linux distros around and again.
I need not to test and examine all the other features and improvements with these hundred Fedora 8 packages and thousand binaries as to conclude a Fedora 8 diary as a whole.
Fedora 8 is enough to start and end my daily computer activities. So far, I am staying with Fedora 8 for good.
I love it, Fedora rocks!
PS
We better watch out for the next Fedora release.
Below are the current file size and MD5SUM (SHA1SUM) of Fedora 8 ISO
~~~~~~~~~~~~~~~~~~~~~~~~~~~~~~~~~~~~~~~~~~~~~~~~~~~~~~~~~~~~~~~~~~~~~~~~~~~~~~~~~~~~~
-rw-r--r-- 1 root root 3424749568 2007-11-14 06:41 Fedora-8-i386-DVD.iso
-rw-r--r-- 1 root root 107833344 2007-11-14 06:41 Fedora-8-i386-rescuecd.iso
-rw-r--r-- 1 root root 133 2007-11-14 06:41 SHA1SUM
782a0e80de1b8e9f24e10e40055cc1b545390cbd Fedora-8-i386-DVD.iso
aa27d819079b8c92efa2ea58a5c0c84825f7a959 Fedora-8-i386-rescuecd.iso
~~~~~~~~~~~~
~~~~~~~~~~~~~~~~~~~~~~~~~~~~~~~~~~~~~~~~~~~~~~~~~~~~~~~~~~~~~~~~~~~~~~~~~

Make Money


Live Traffic
